DivIt User Manual
Everything you need to know to split bills, request payments, and settle up.
Getting Started
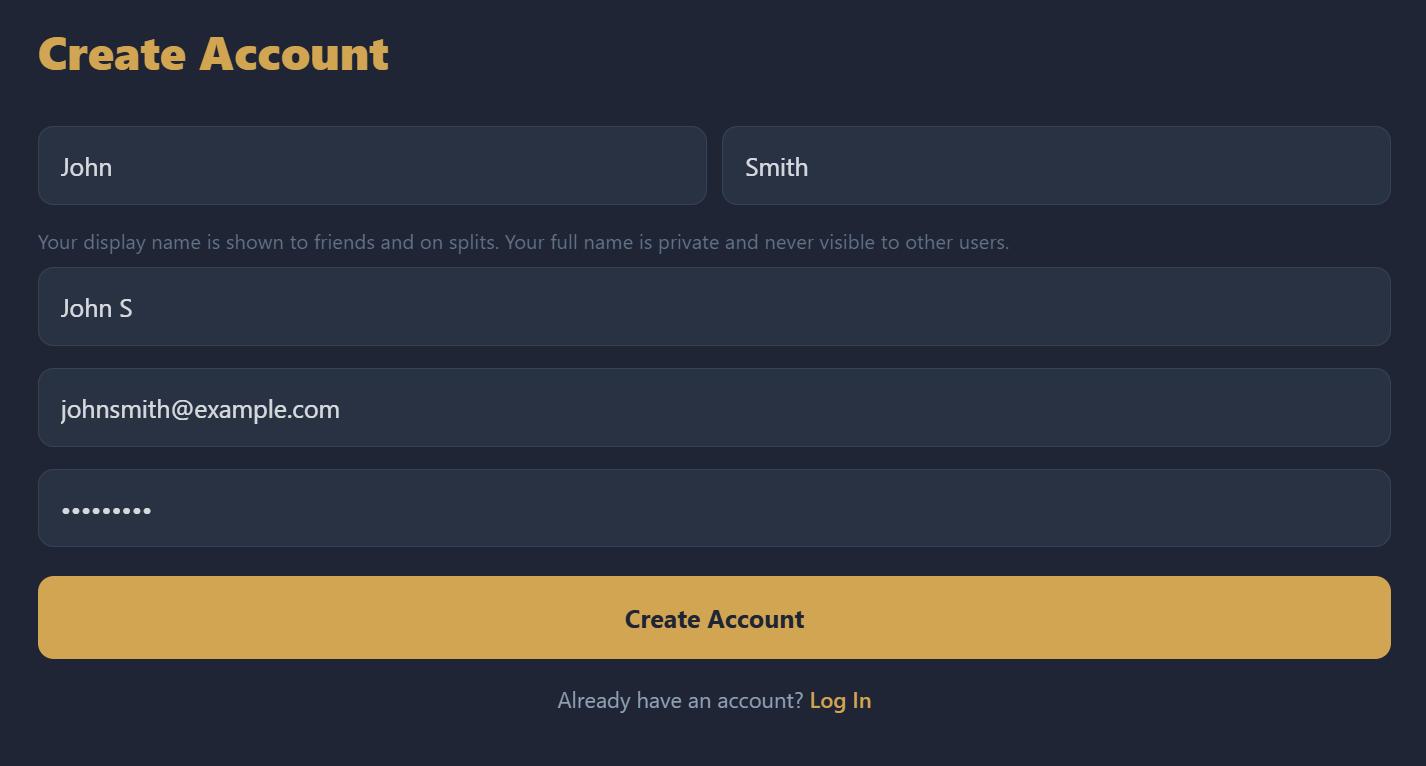
Creating an Account
When you first open DivIt, you'll see a welcome walkthrough introducing the app's core features: receipt scanning, bill splitting, and payment requests.
To create an account:
- Tap Create Account on the last welcome slide
- Enter your First Name and Last Name (these are private)
- Your Display Name is auto-generated (e.g., "Sean E") — this is what friends see. You can customize it.
- Enter your Email and choose a Password (minimum 6 characters)
- Tap Create Account
Alternatively, tap Sign in with Google to create an account using your Google credentials. If someone invited you via a referral link, the friendship is automatically created when you sign up.
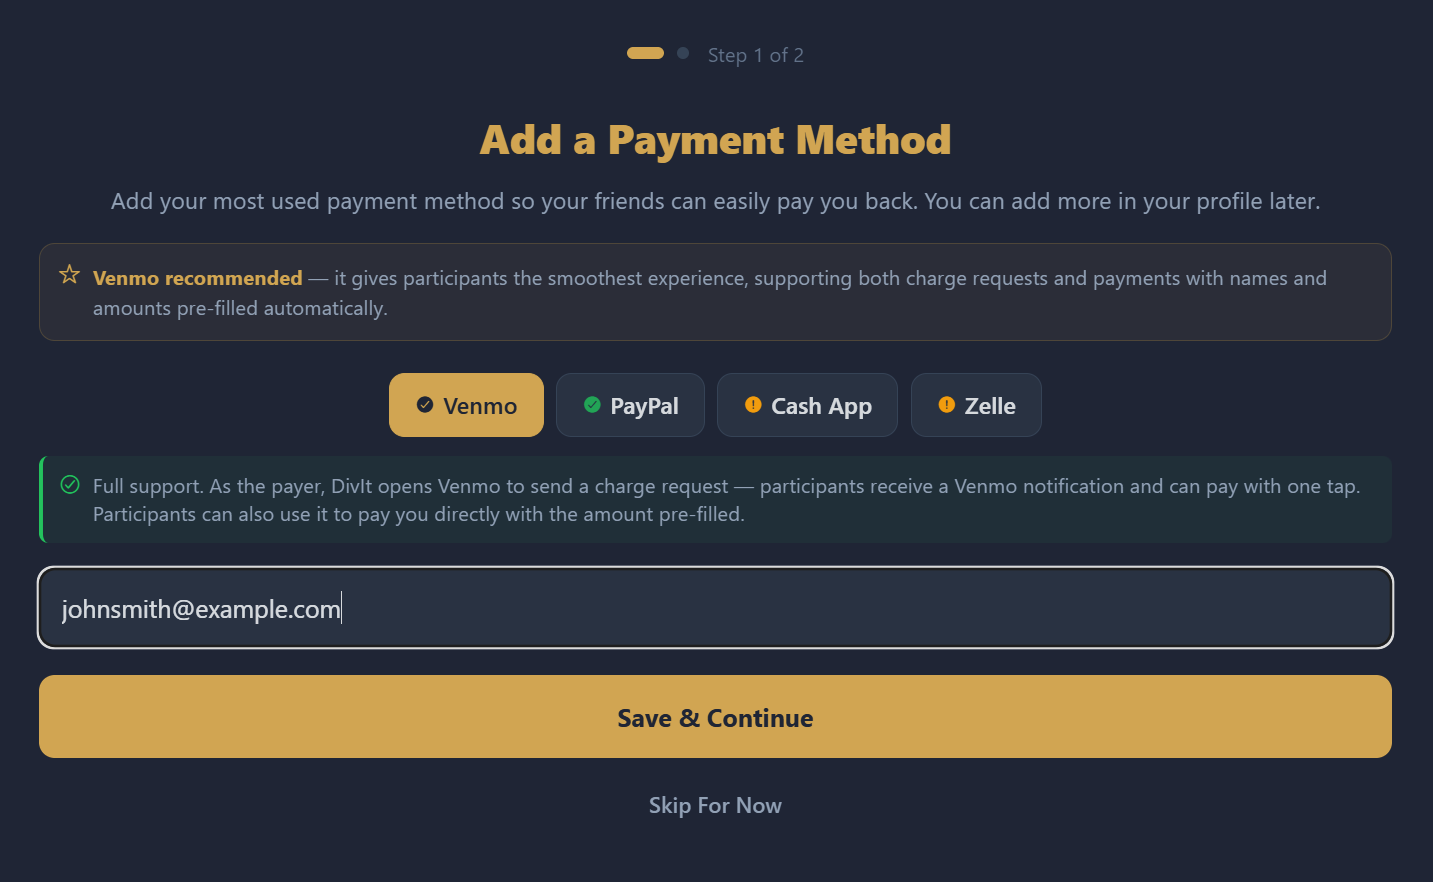
Setting Up Payment Methods
After registering, you'll be prompted to set up your preferred payment method. DivIt supports four platforms:
| Platform | What to Enter | Support |
|---|---|---|
| Venmo | Your Venmo email address | Full |
| PayPal | Your PayPal.me username | Full |
| Cash App | Your $Cashtag | Partial |
| Zelle | Your phone number or email | Partial |
Select a platform, enter your handle, and tap Save & Continue. You can also tap Skip For Now and set this up later in your profile.
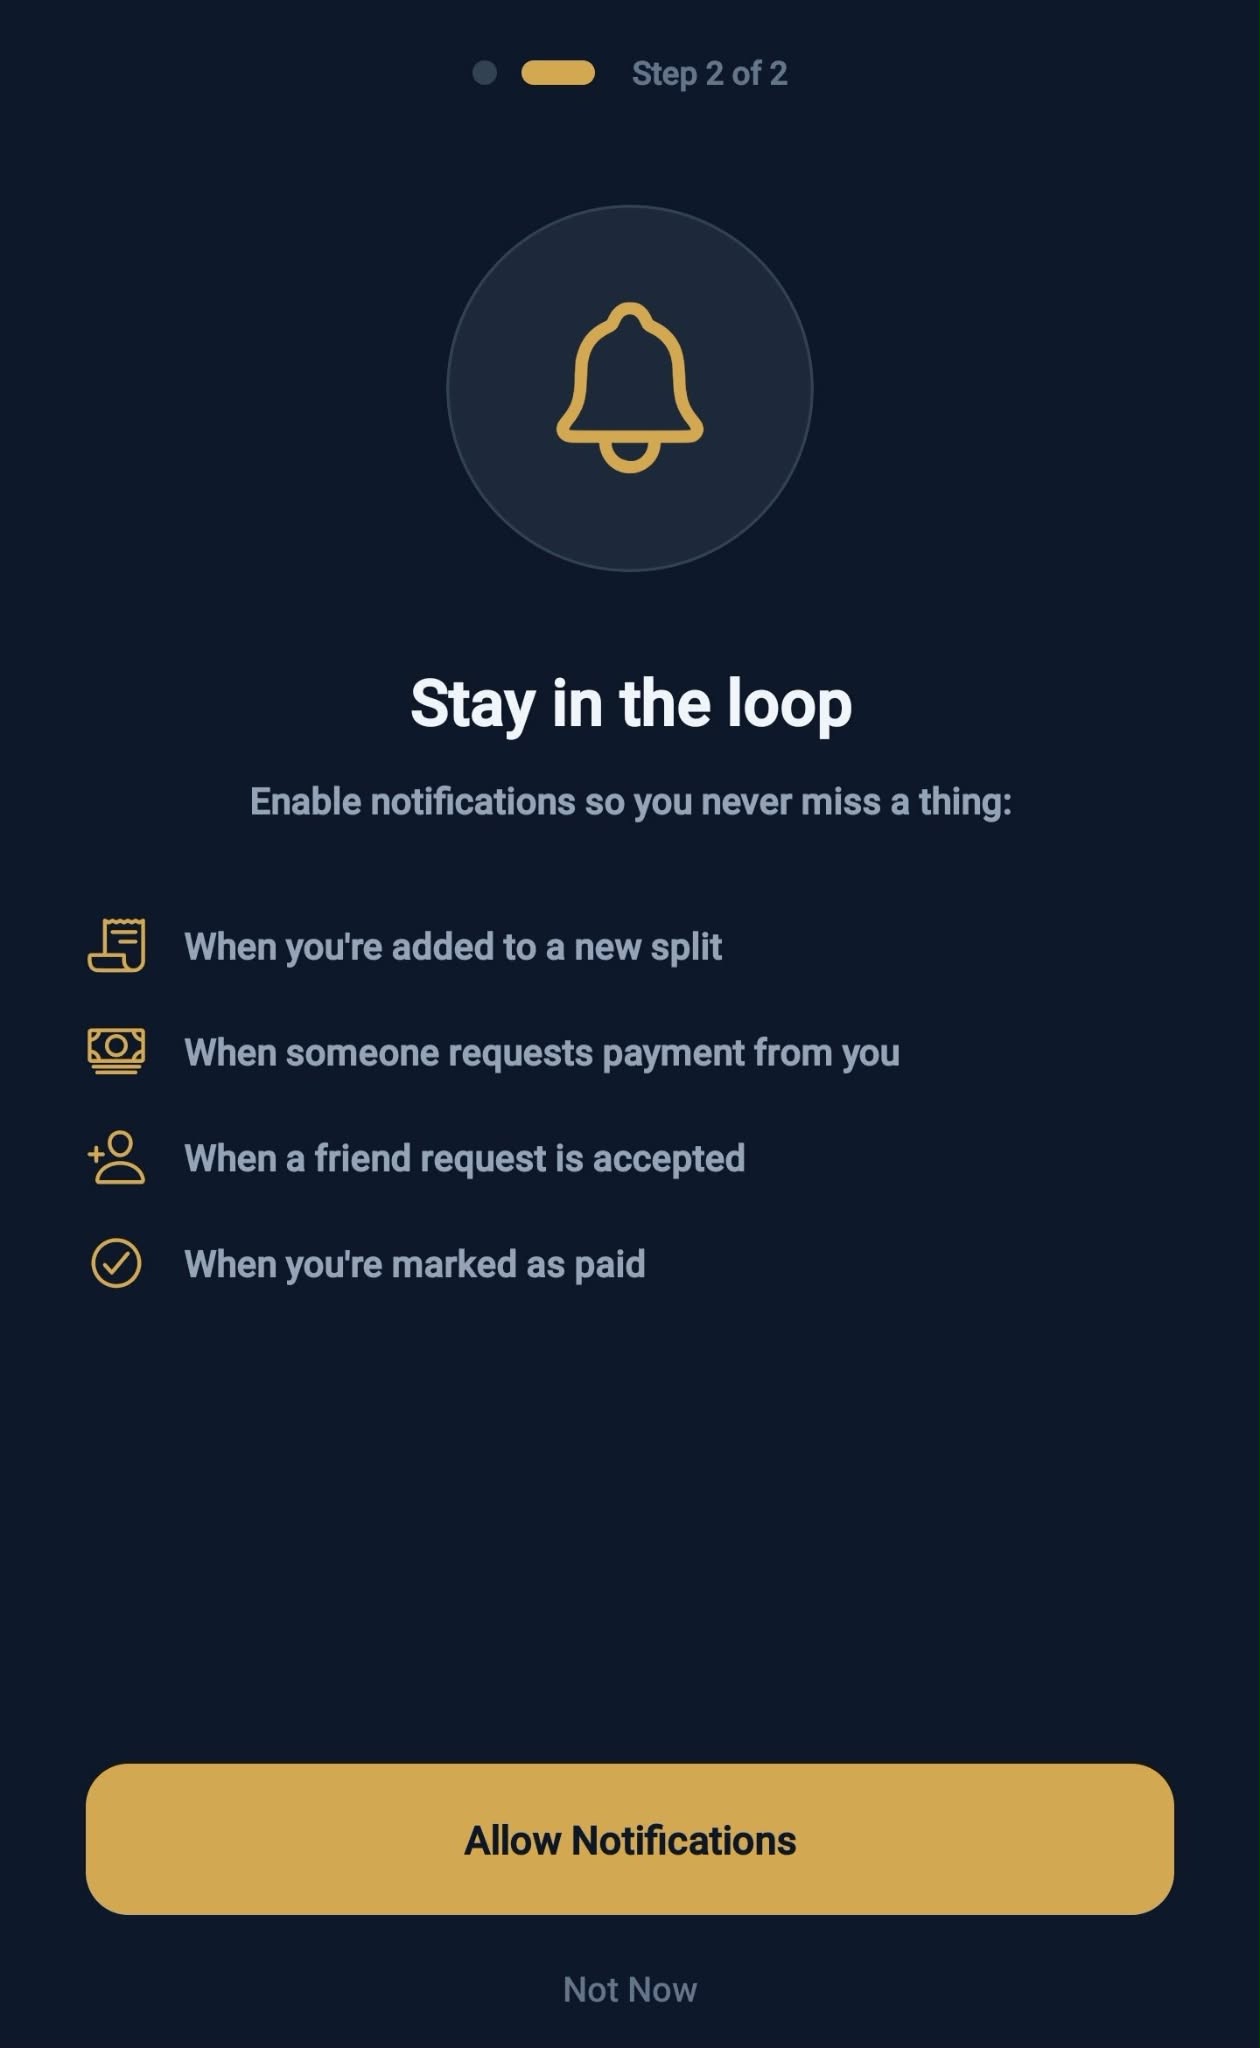
Enabling Notifications
The final setup step asks for notification permissions. Enabling notifications lets you know when:
- You're added to a new split
- Someone requests payment from you
- A friend request is accepted
- Someone marks themselves as paid
- A split is fully settled
- Collection activity occurs
You can customize which notifications you receive later in your profile settings.
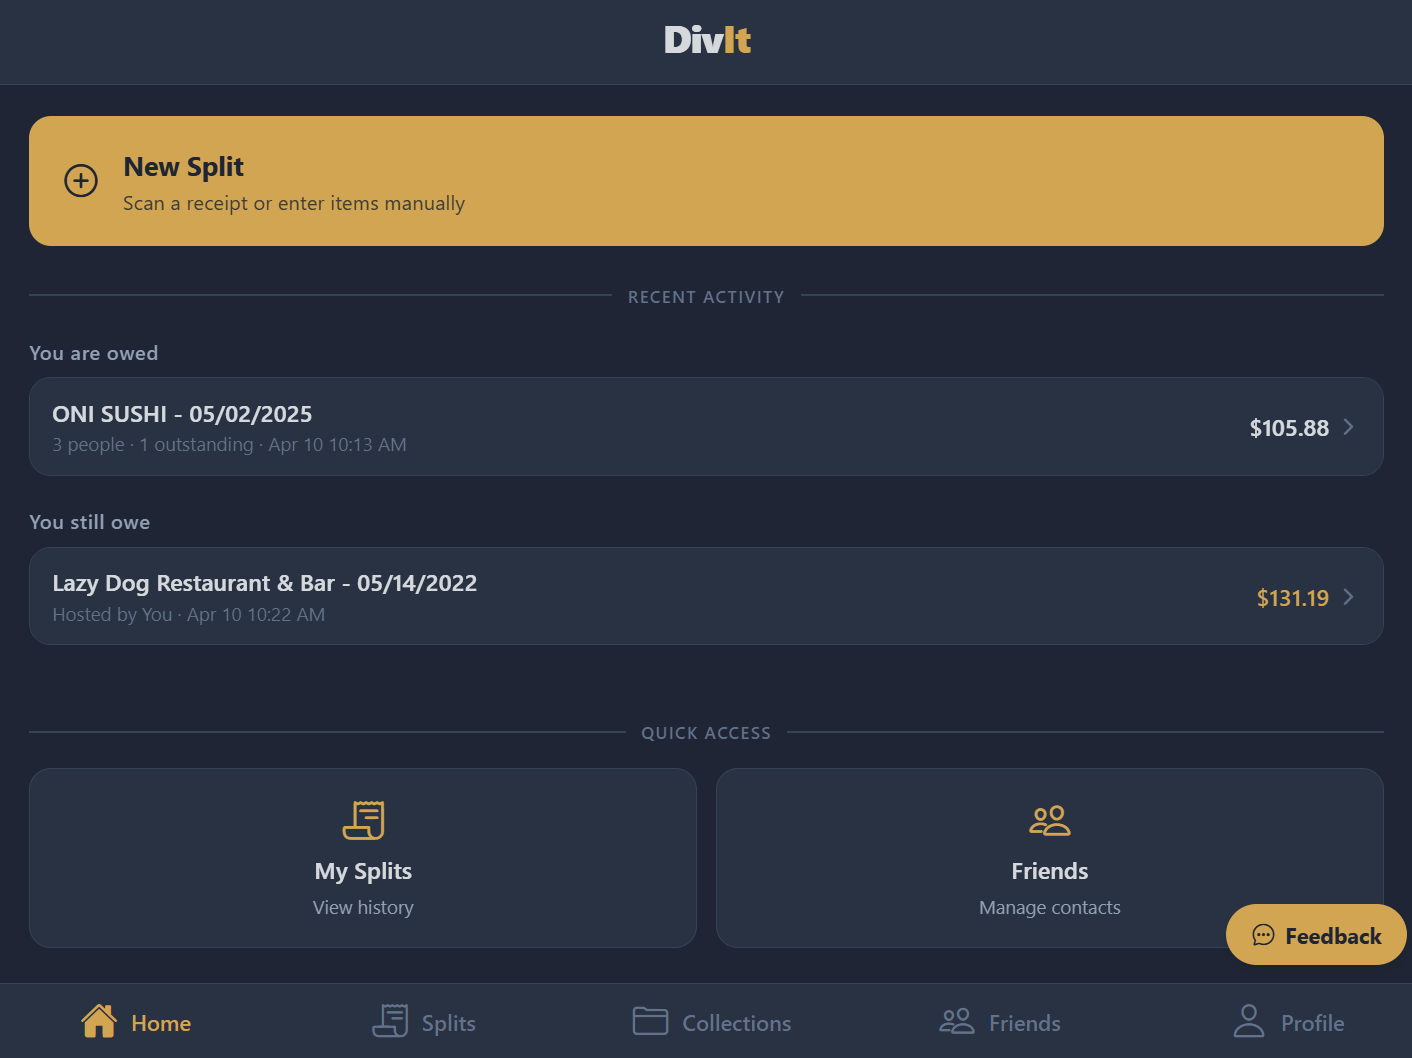
Home Screen
The home screen is your dashboard. It shows:
- Active collection banner — Your most recently updated collection with a quick action to add a split
- Splits you're hosting — The 3 most recent splits you created or are the payer for
- You still owe — Splits where you have an unpaid balance
- Quick access cards — Shortcuts to "My Splits" and "Friends"
- Feedback button — A floating button in the bottom-right corner to submit feedback or report bugs
Tap the large New Split button to start splitting a bill.
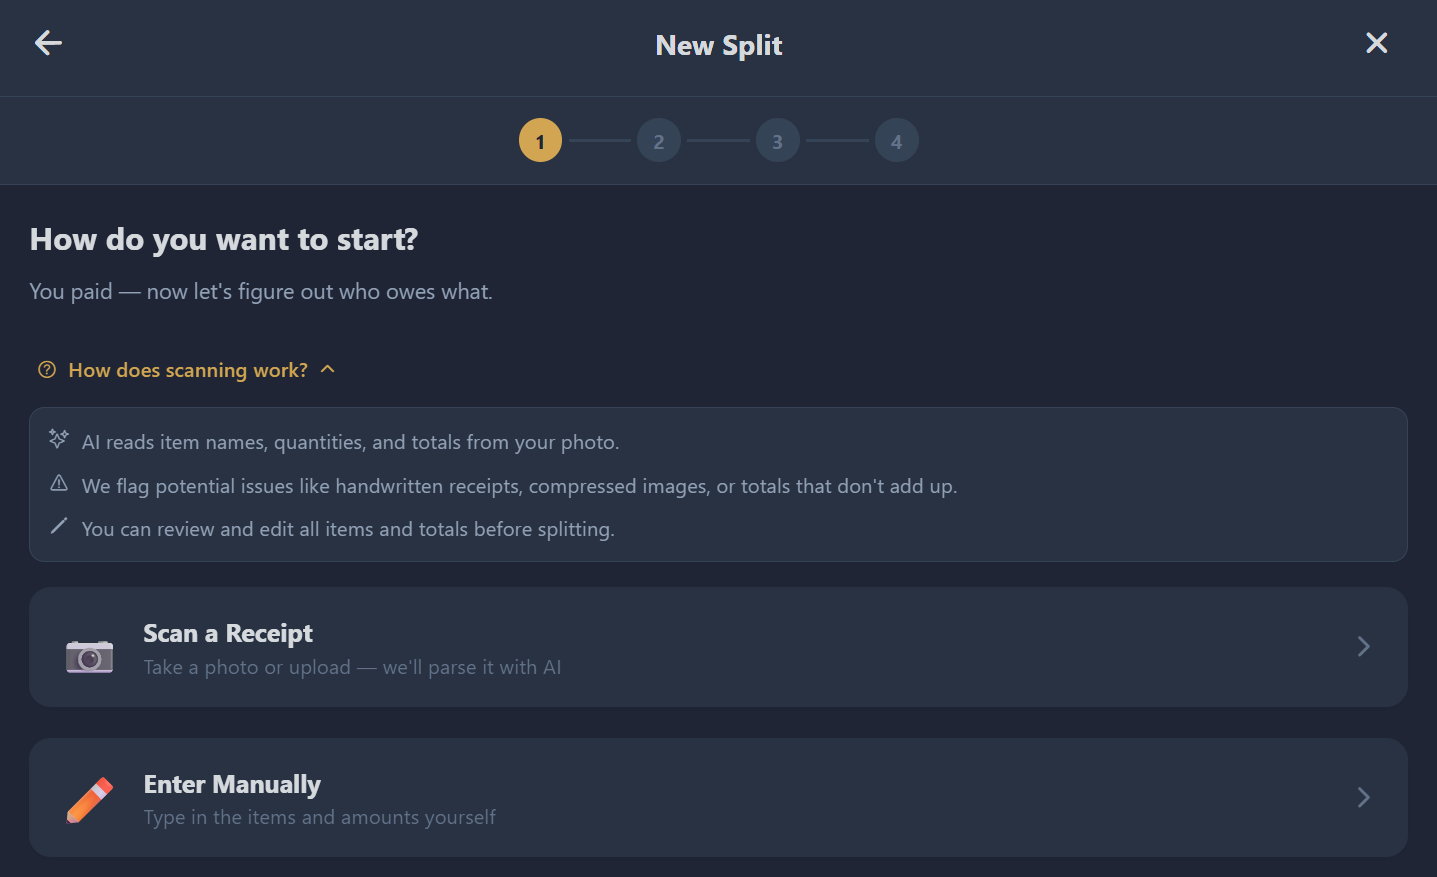
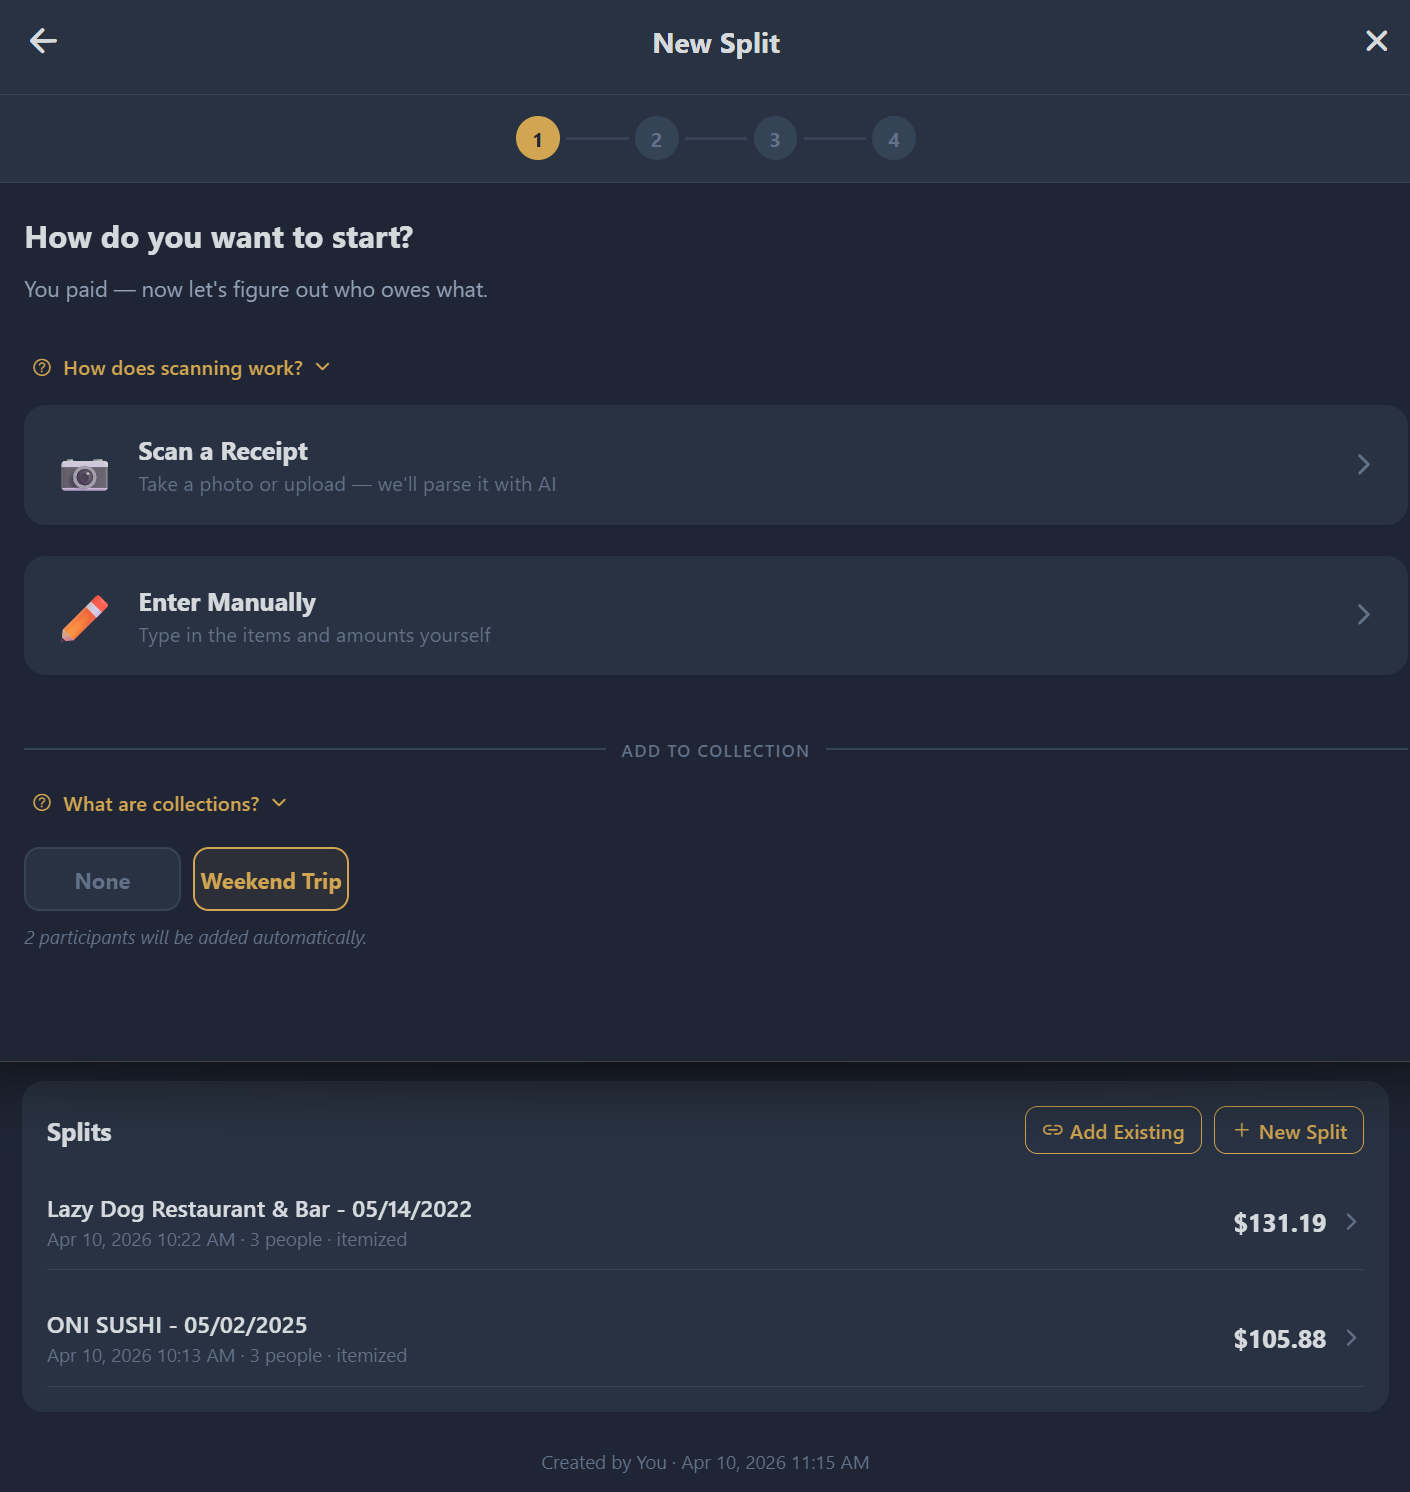
Creating a Split
Scanning a Receipt
- From the home screen or splits tab, tap New Split
- Select Scan a Receipt
- Choose Take a Photo (camera) or Choose from Library
- Hold your phone upright so the receipt text reads top-to-bottom for best results
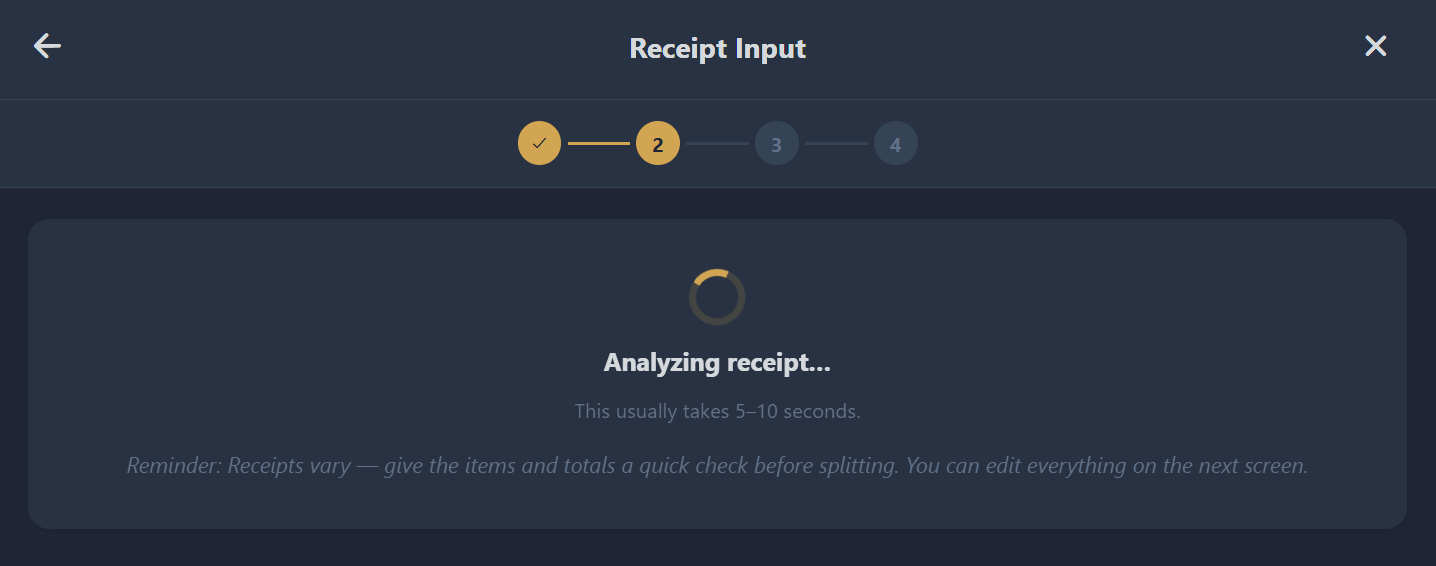
- Wait for the upload and processing — this typically takes 3–8 seconds
DivIt uses AI to extract the restaurant name, date, line items, tax, tip, gratuity, and any adjustments from the receipt photo.
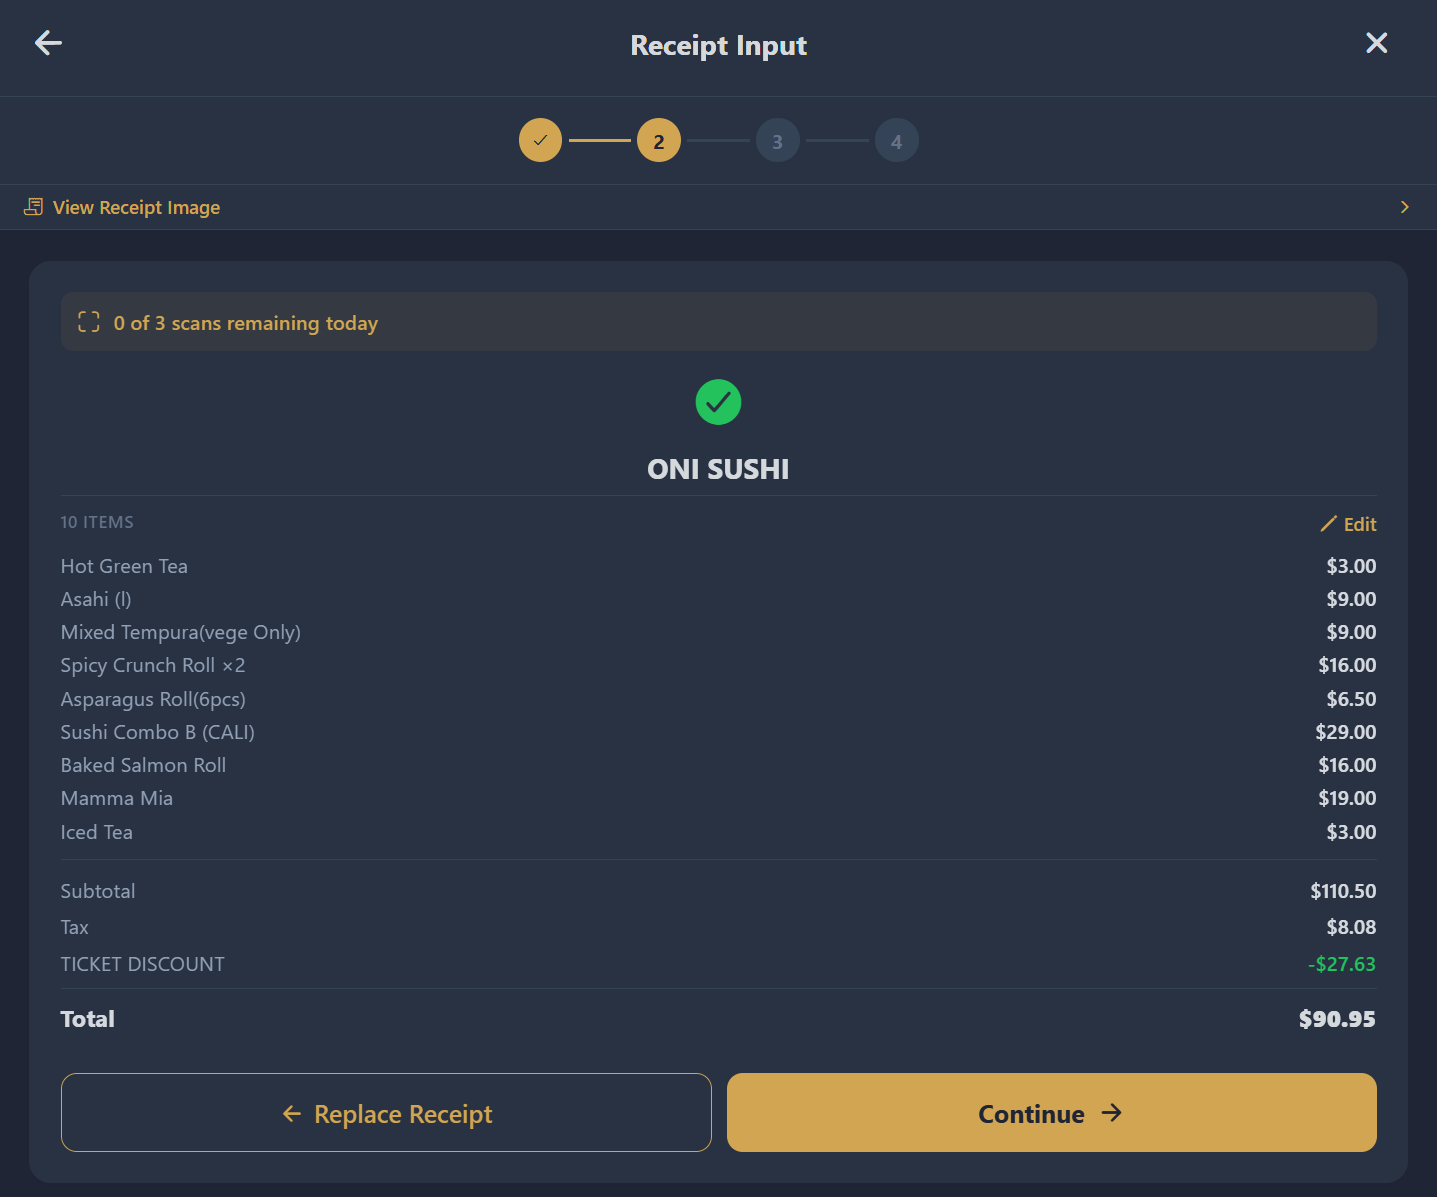
Free accounts have a limited number of scans per day (shown in your profile). Premium accounts get unlimited scans. You get one free re-scan per day if you need to replace a receipt.
Reviewing Parsed Items
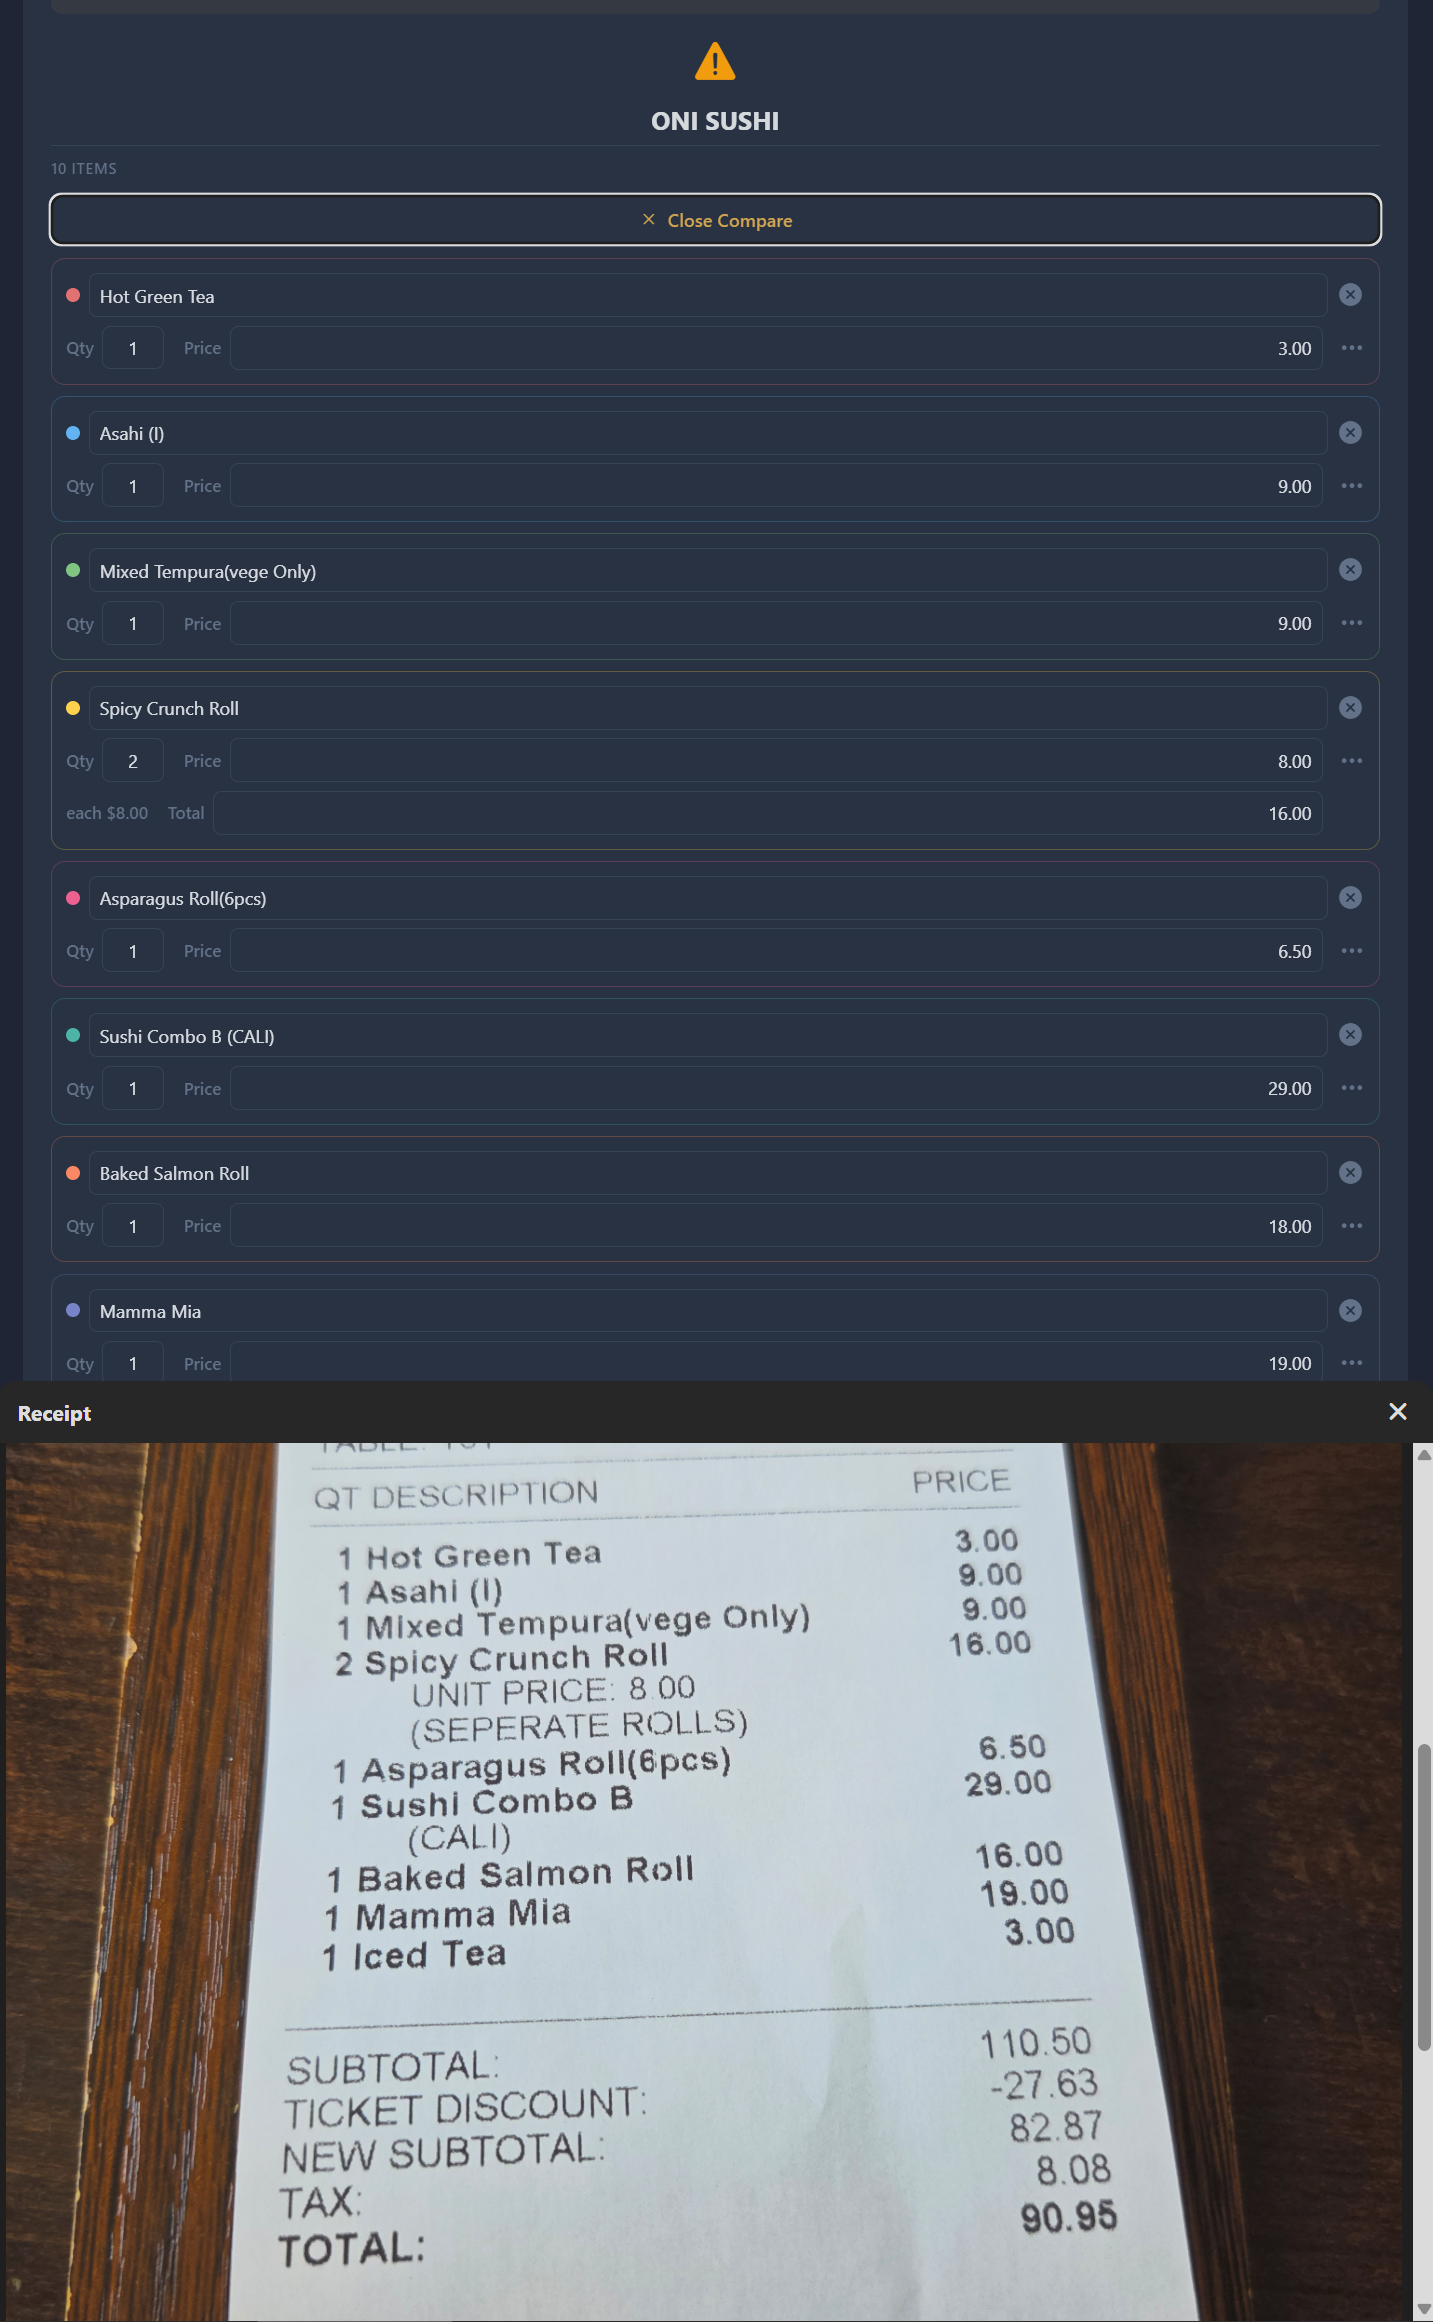
After scanning, you'll see the parsed results: restaurant name, line items with prices, and totals. If everything looks correct, tap Continue to proceed.
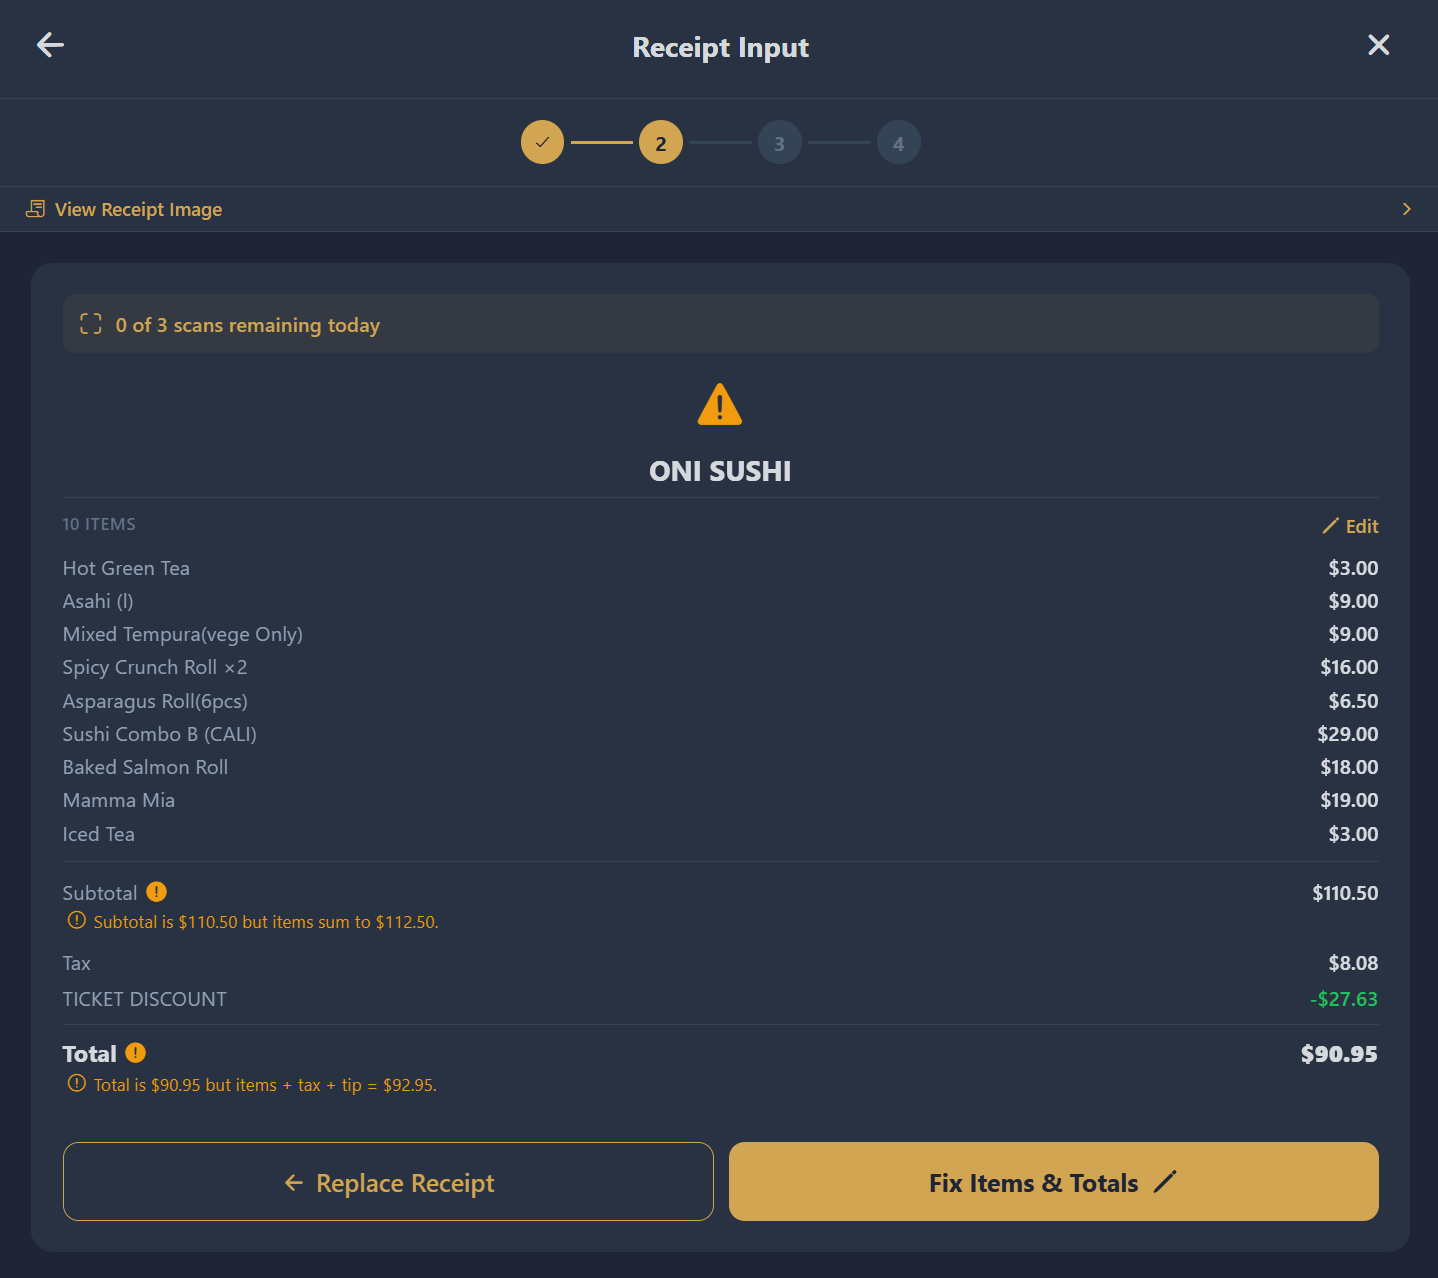
If there's a mismatch between the parsed totals and the item sums, the Continue button changes to Fix Items & Totals — tap it to enter edit mode.
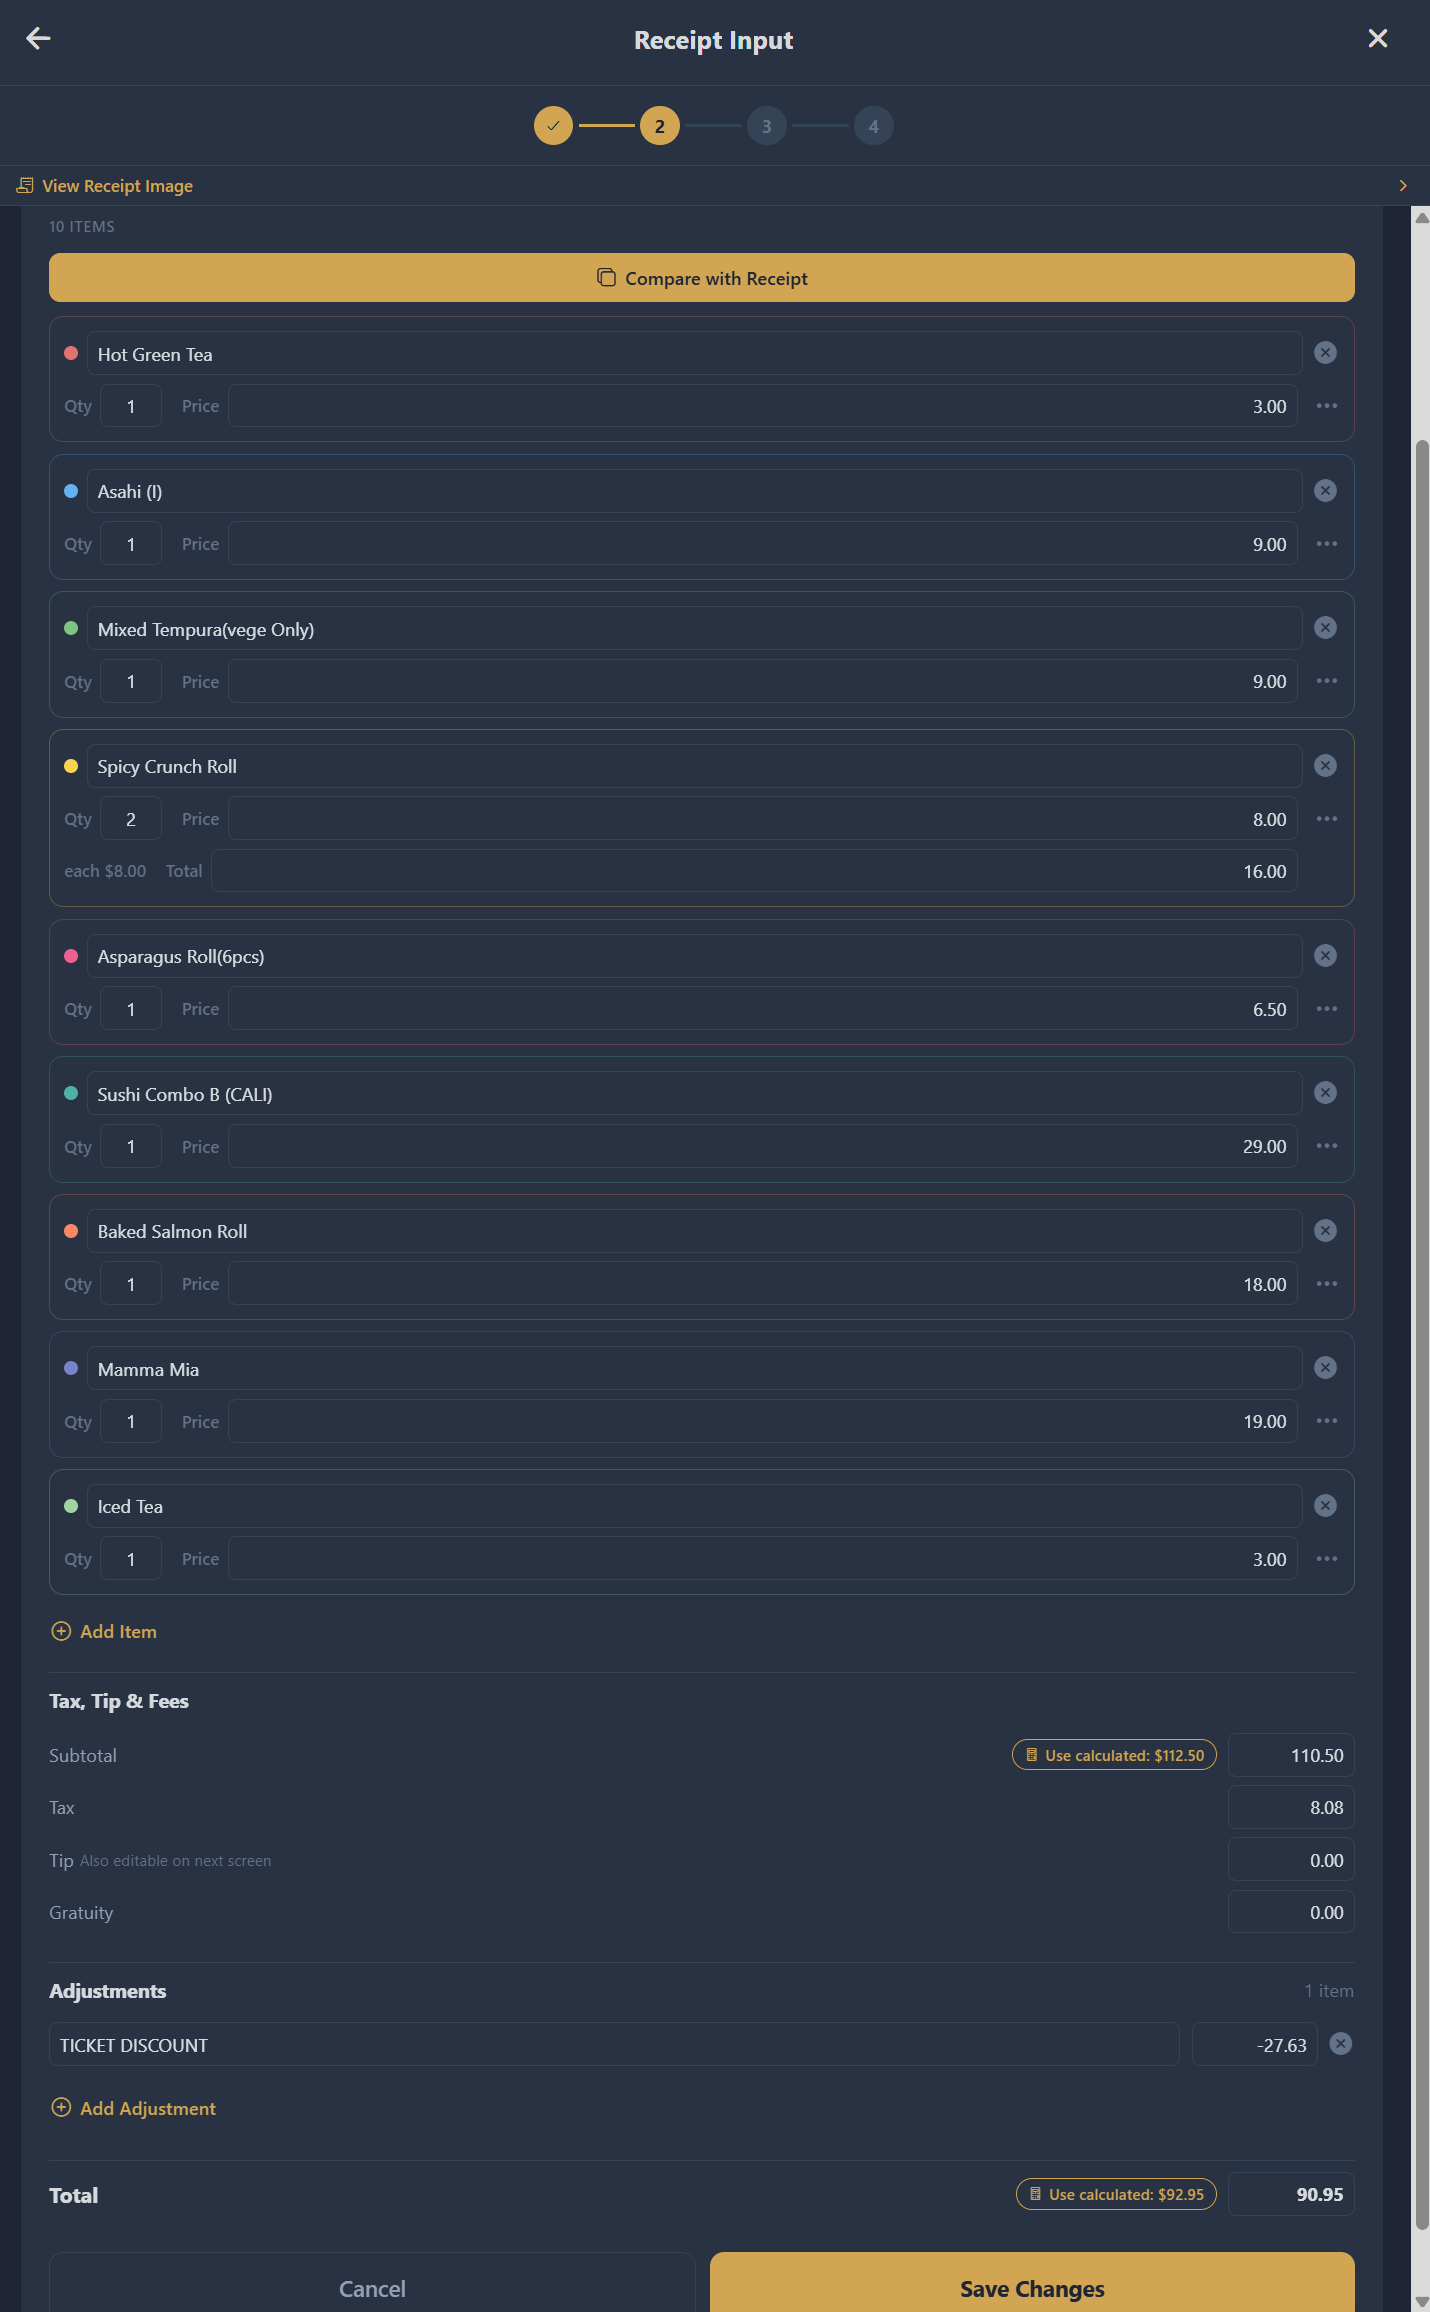
Editing Items & Totals
When you tap Edit or Fix Items & Totals, you enter the receipt editor:
- Item cards — Each item displayed as a card with color-coded borders matching the assignment step. Name on the first line, quantity/price on the second.
- Overflow menu — Tap ... on any item to add an item-specific adjustment (e.g., a discount for that item only)
- Tax, Tip & Fees section — Edit tax, tip, and gratuity amounts
- Adjustments section — Add bill-wide discounts or surcharges. Each adjustment has a ⋯ menu that lets you choose Proportionally (default, weighted by each person's items) or Evenly (divided equally). Use Evenly for flat fees like shipping or delivery so the person who ordered less doesn't get overcharged. An Even pill appears next to the amount when a non-default choice is set.
- Subtotal & Total — Both always editable. Use the Use calculated button to auto-fill from item math.
- Compare with Receipt — Opens the receipt image in a split-screen view at the bottom. Both areas scroll independently.
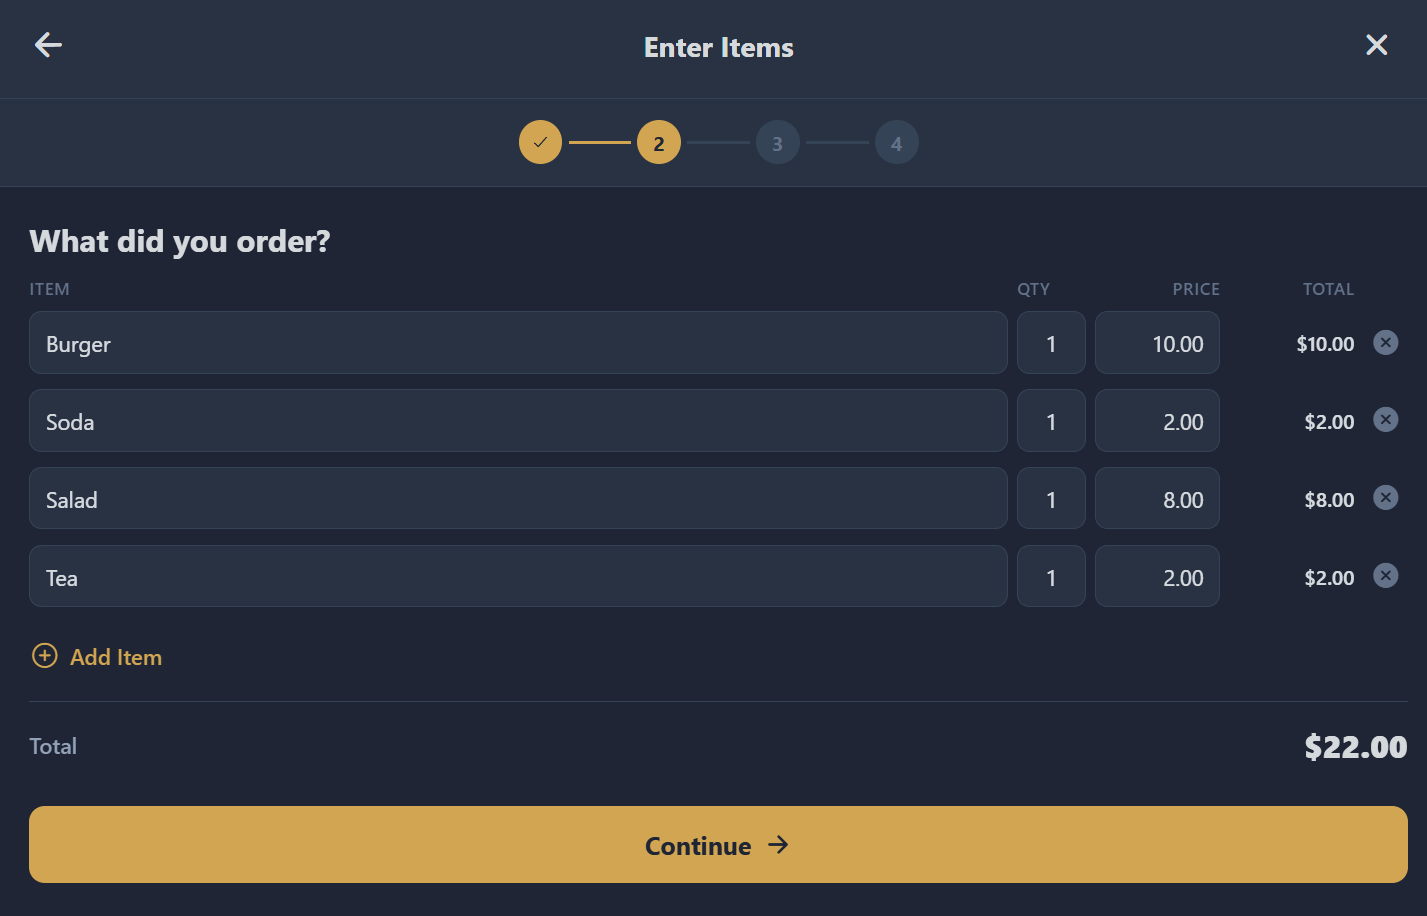
Entering Items Manually
If you don't have a receipt:
- Select Enter Items Manually on the source screen
- Add line items with a name, quantity, and unit price
- Tap + Add Item to add more rows
- Tap Continue when done
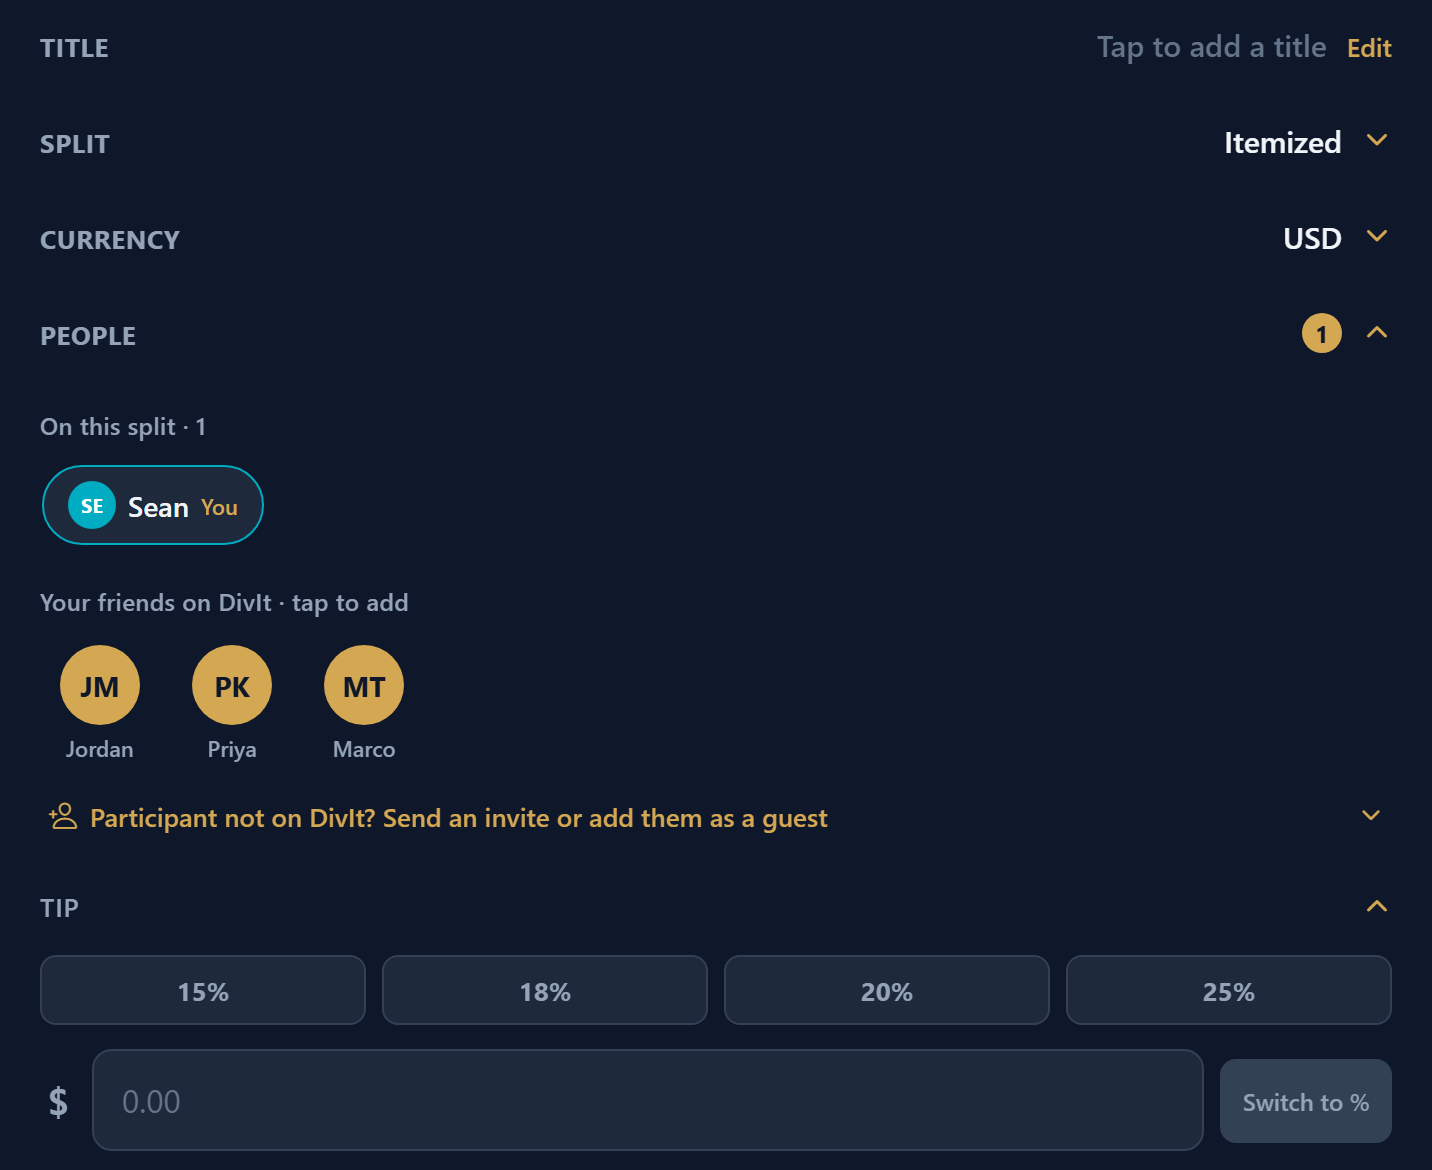
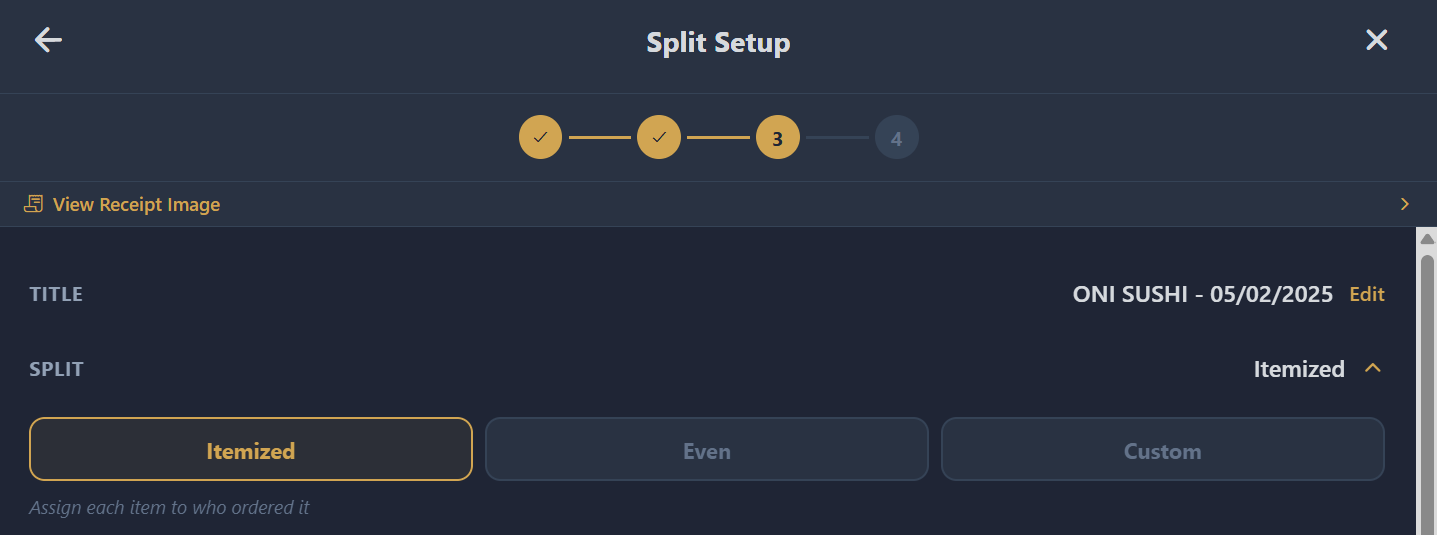
Setting Up Split Details
The details step is where you configure how the bill is split:
- Title — Auto-populated from the receipt. If no restaurant name was detected, the field opens in edit mode with a warning.
- Split Method — Choose Itemized, Even, or Custom
- Currency — Defaults to USD. Tap to change.
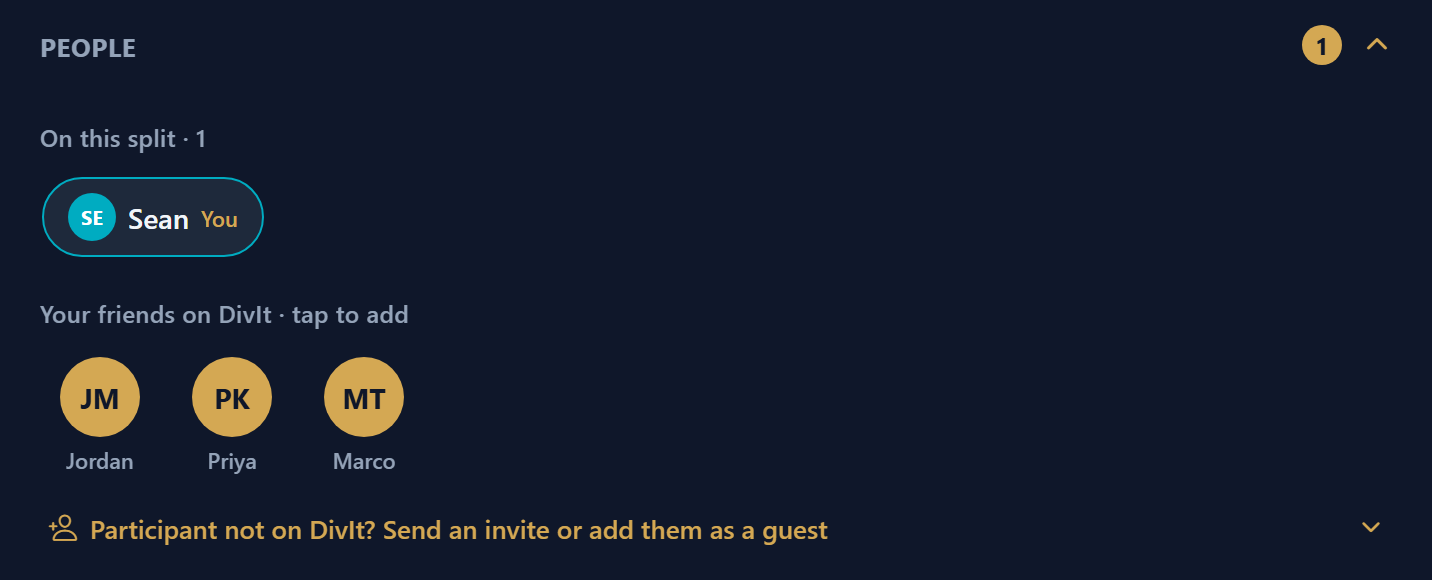
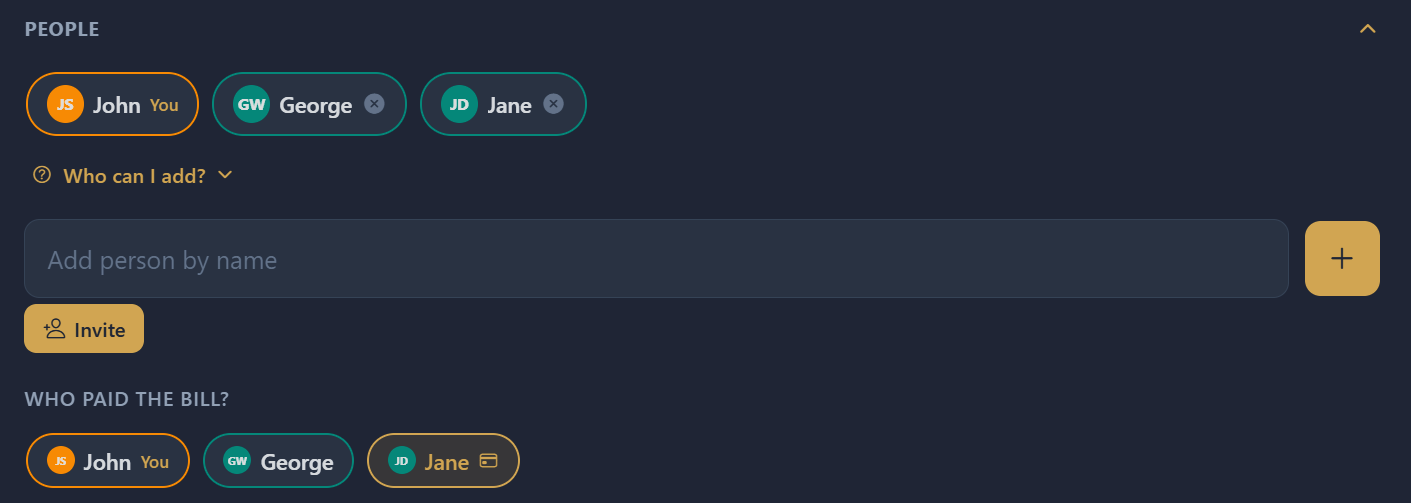
- People — Add friends to the split
- Who paid the bill? — Set the payer
- Collection — Optionally assign to a collection
- Tip & Gratuity — Adjust amounts
Choosing a Split Method
| Method | How it works | Best for |
|---|---|---|
| Itemized | Assign each item to who ordered it. Tax, tip, and fees distributed proportionally. | Restaurant bills where people ordered different things |
| Even | Divide the total equally among all participants | Shared meals, group orders, utilities |
| Custom | Set a specific amount for each person manually | Uneven splits with agreed-upon amounts |
Adding Participants
- Friends on DivIt — Friends appear as tappable chips. Recently split-with friends appear first. Nearby friends show a Nearby badge.
- Participant not on DivIt? — Expand this section to type a name and tap + Guest, or tap Invite a friend to DivIt to share a sign-up link. The friend list refreshes every 10 seconds, so invited friends appear as chips above as soon as they sign up.
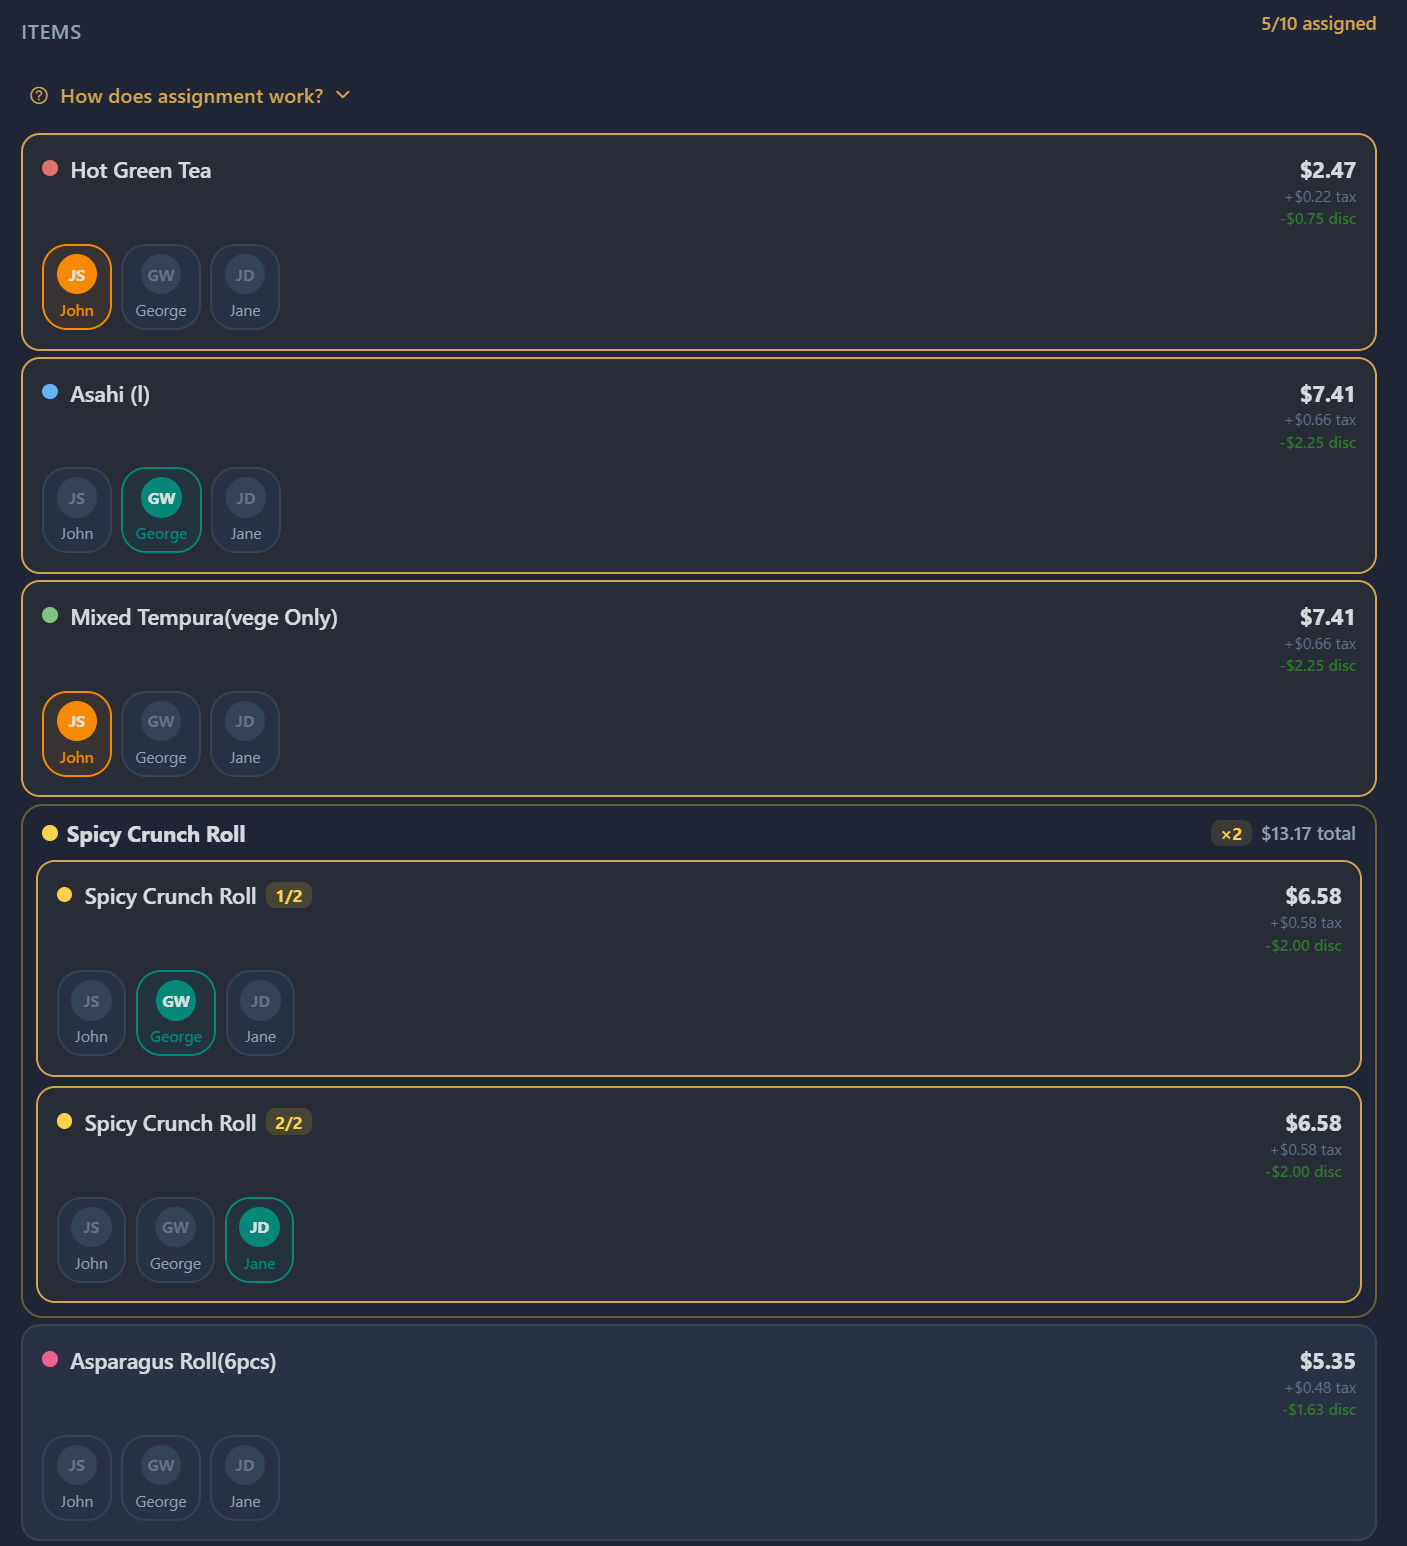
Assigning Items (Itemized Splits)
For itemized splits, each item appears as a card with colored borders. Tap participant chips below each item to assign it. Items assigned to multiple people split the cost. Unassigned items default to the host.
Setting the Payer
The payer is the person who covered the bill. By default, this is you. To change it, tap another participant's chip in the "Who paid?" section. The payer is automatically marked as "paid" and receives payment requests from other participants.
Adding Tips & Gratuity
If a tip or gratuity was detected from the receipt, it's pre-filled. You can adjust it using dollar or percentage mode (tap the toggle to switch). Both are distributed proportionally among participants — only bill-wide adjustments (not tip or gratuity) support the Evenly split option.
Tip is a voluntary amount you add. Gratuity is a mandatory service charge on the bill (common for large parties). They're tracked and distributed separately.
Viewing & Managing Splits
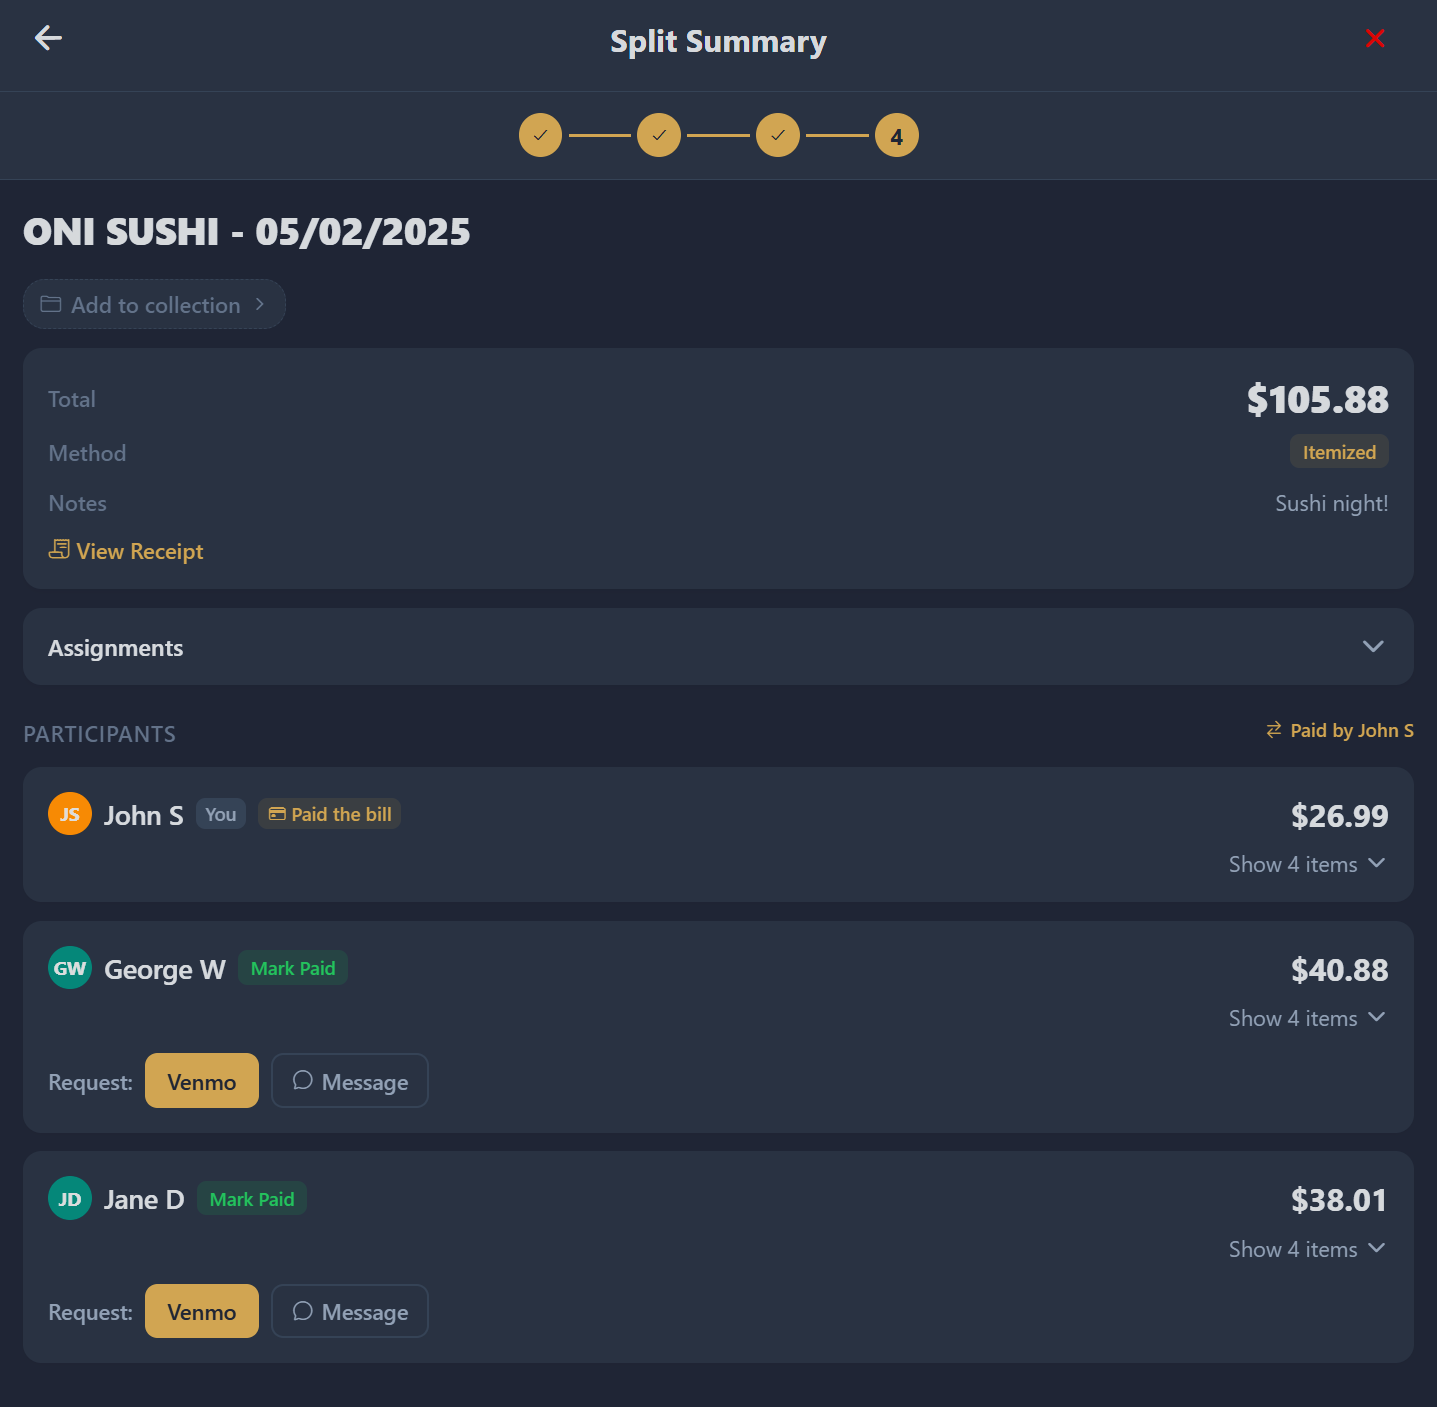
Split Detail Page
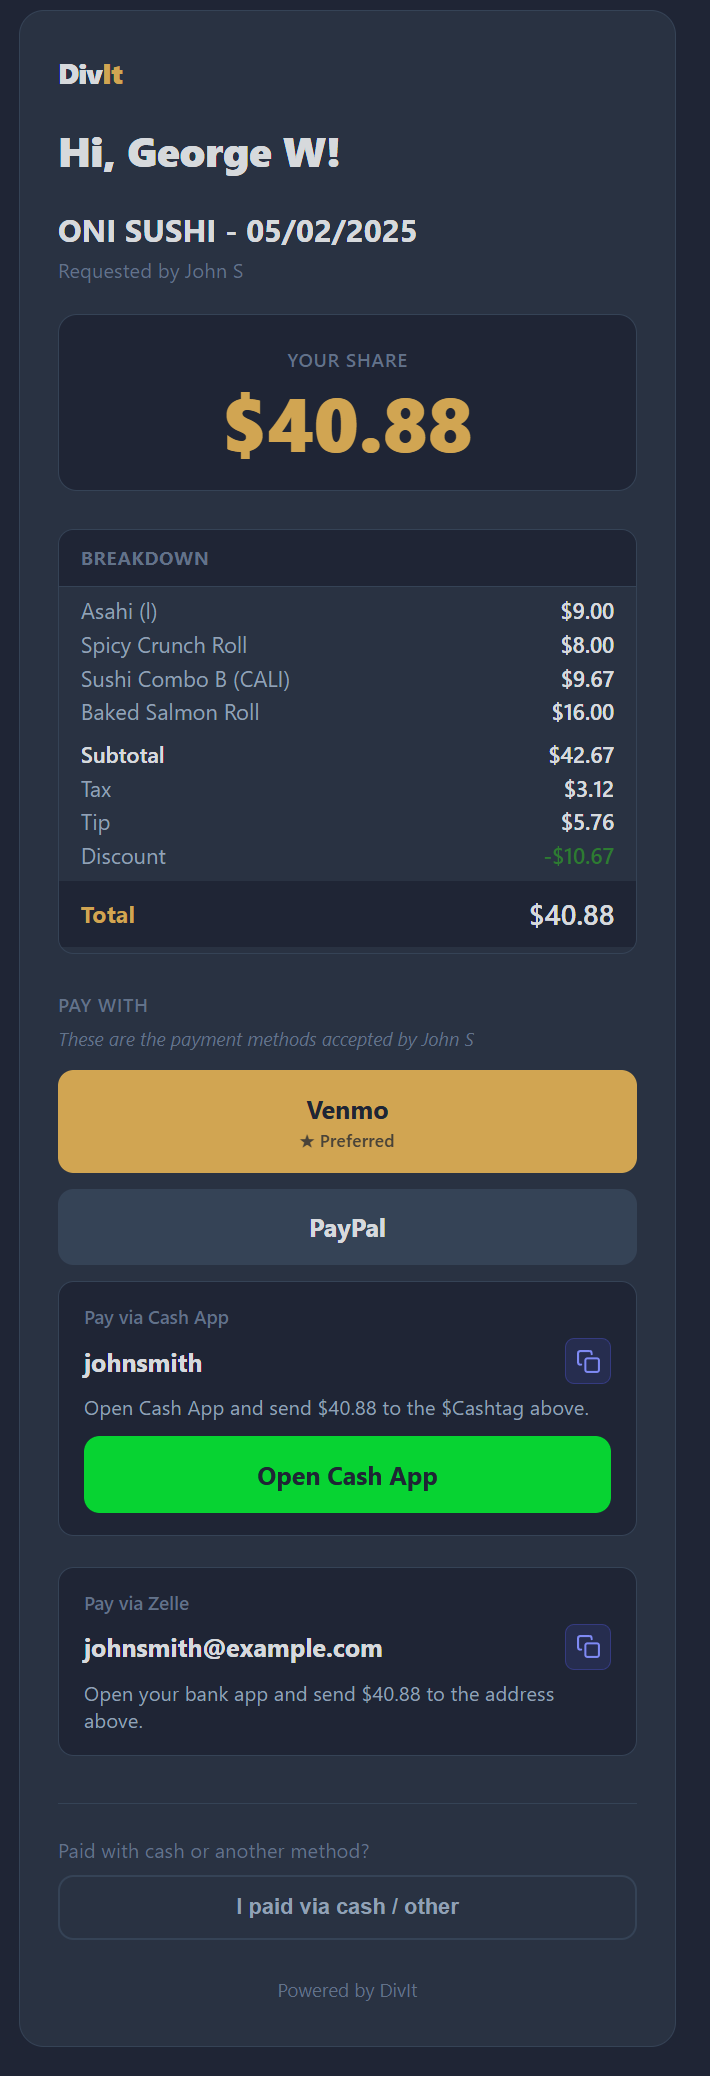
The split detail page shows everything: title, creator, date, method badge, total amount, participant list with amounts and paid status, item breakdown, payer info with payment handles, and the receipt image.
Notify Participants
The Notify Participants button at the bottom of the split detail page (creator/payer only) sends a push notification to every registered participant who hasn't paid. Tap it after creating a split so people know what they owe, and tap it again later as a reminder for anyone still outstanding.
- Paid participants are skipped
- Guest participants don't receive pushes — share the guest link with them directly
- Participants who disabled payment-request notifications in their preferences are skipped
- First send vs. follow-up use different push copy so recipients know which is which
There's a 1-hour cooldown between sends per split to prevent accidental spam. If you tap during cooldown, the button shows how long to wait.
Requesting Payment
As the payer, tap the payment button next to a participant's name and choose a platform:
- Venmo — Opens Venmo app with pre-filled charge request, or the Venmo web charge page if the app isn't installed
- PayPal — Shares a PayPal.me link with the participant
- Cash App — Shares a Cash App link pre-filled with your $Cashtag and amount. Tapping the link opens Cash App if installed; otherwise it lands on a QR code page (Cash App requires the app for direct pay)
- Zelle — Shares your handle with manual send instructions (Zelle has no payment URL)
- Guest Link — Generates a web page for non-DivIt users
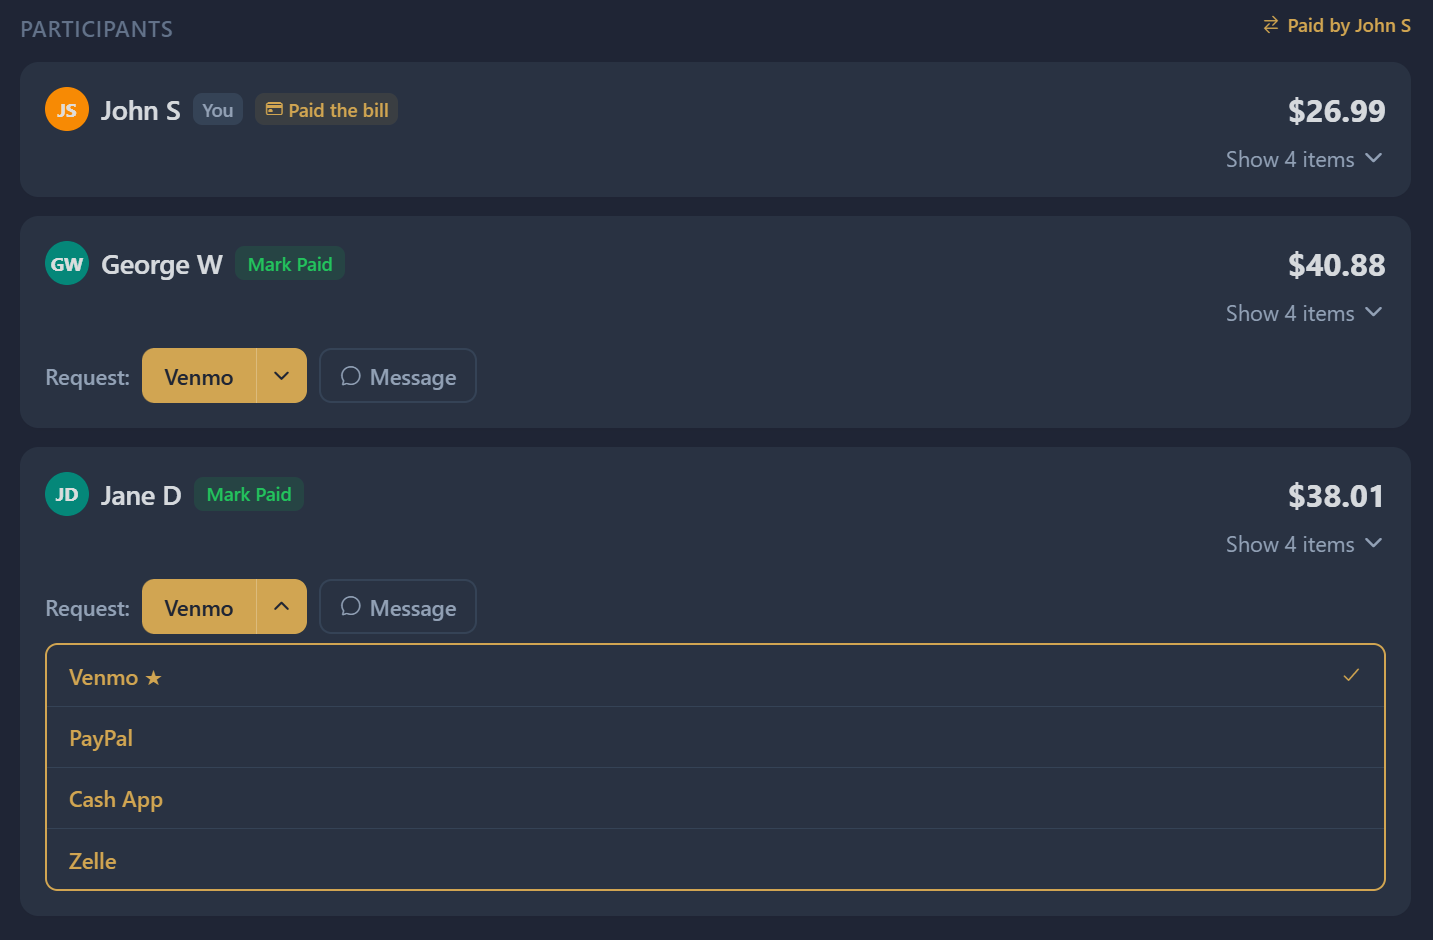
Marking Participants as Paid
Tap Mark as Paid next to a participant's name. When all participants are paid, the split moves to "Completed." Participants can also mark themselves as paid, which sends a notification to the payer.
Editing Assignments
On the split detail page, expand the Assignments section to reassign items. Tap Save to recalculate totals or Cancel to discard changes. If participants were already marked as paid, you'll be asked whether to reset their paid status.
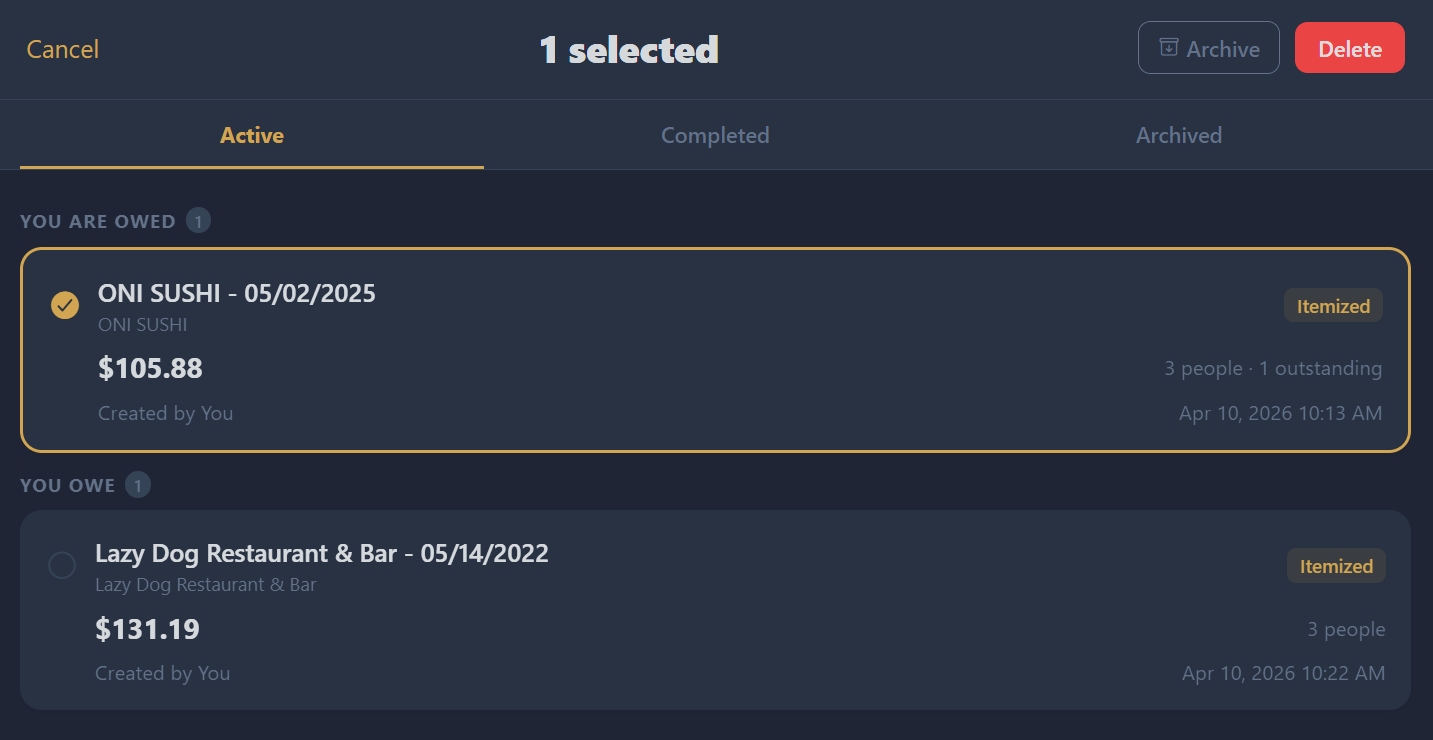
Archiving & Deleting Splits
Archived splits are read-only. Receipt images are permanently deleted on archive. Download the receipt image first if you need to keep it.
- Splits older than 30 days are automatically archived (unless in an unsettled collection)
- Long-press on the Splits tab to select and archive/delete manually
- Only the split creator can archive or delete
Guest Payment Page
When you generate a guest link for a participant, they receive a web page showing their name, amount owed, full breakdown, and payment buttons. No DivIt account required.
On mobile, payment buttons try to open the app directly (e.g., Venmo). If the app isn't installed, it falls back to the web version. In-app browsers (Messenger, Instagram, etc.) go straight to the web link.
Collections
Collections group related splits — perfect for trips, roommate expenses, or events with multiple bills.
Creating a Collection
- Go to the Collections tab and tap +
- Enter a Title (required)
- Optionally add a description and date range
- Add participants from your friends list
- Tap Create

Adding Splits to a Collection
Add splits during creation (via the Collection selector in split details) or from the collection detail page (tap Add Split).
Viewing Balances & Settlement
The Balances tab shows net balances and a simplified settlement plan — the minimum payments needed to settle up. Payment handles are shown with copy buttons for easy sharing.
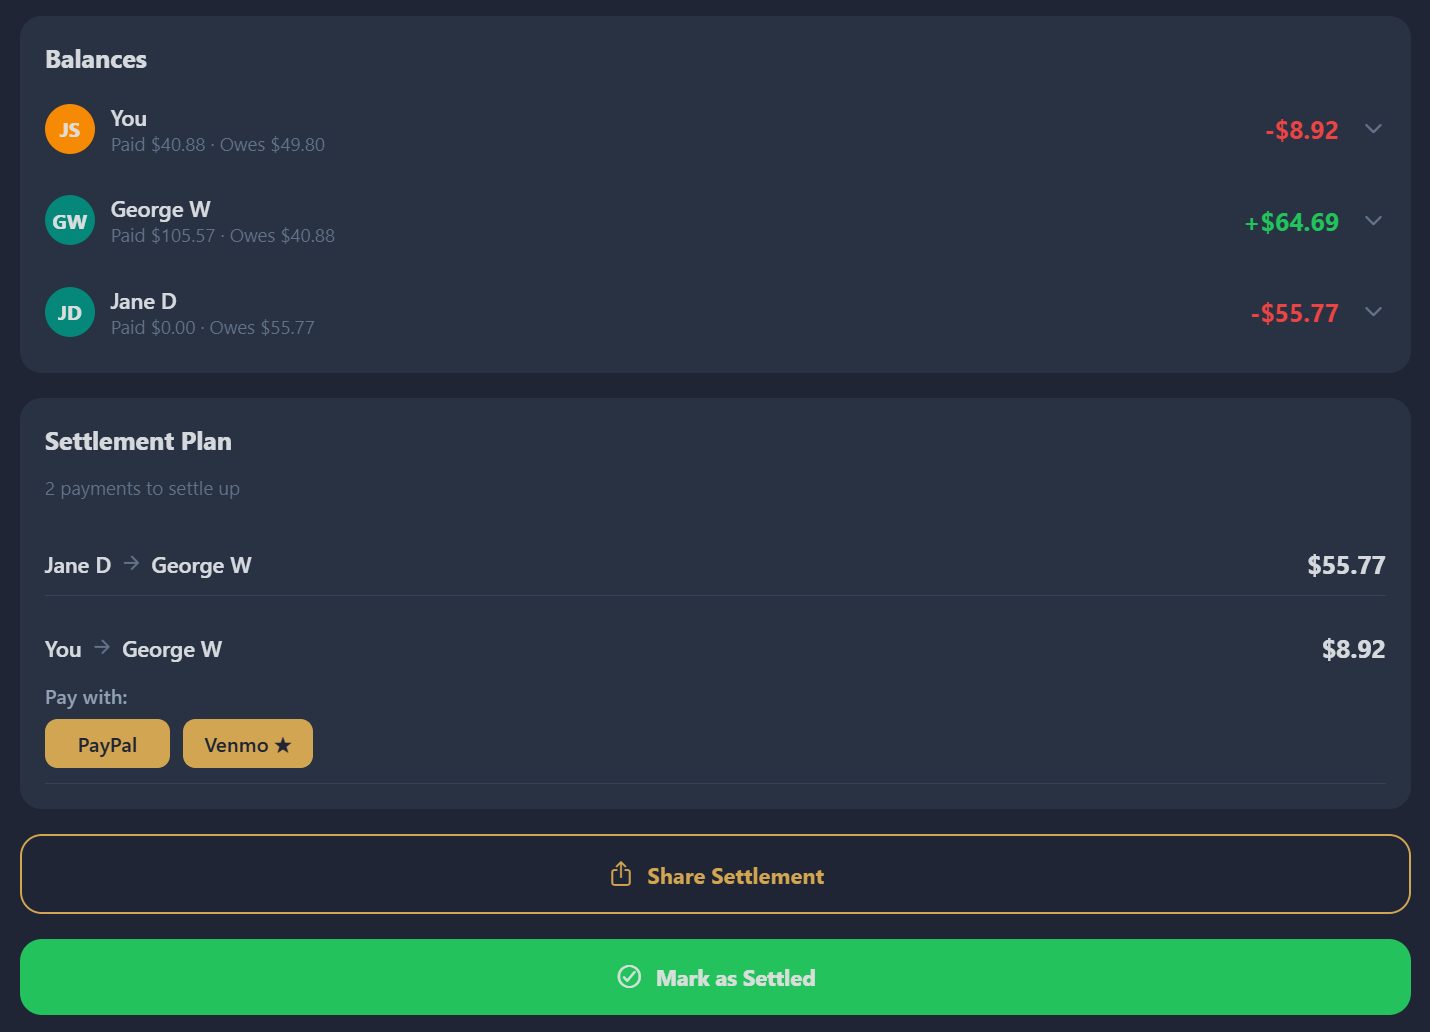
Settling a Collection
Tap Settle Collection when everyone has paid. The collection moves to "Completed" and becomes read-only. You can reopen it with Unsettle if needed.
Friends
Adding Friends
Search by name or username on the Friends tab and tap Add. If someone already sent you a request, tapping Add auto-accepts it.
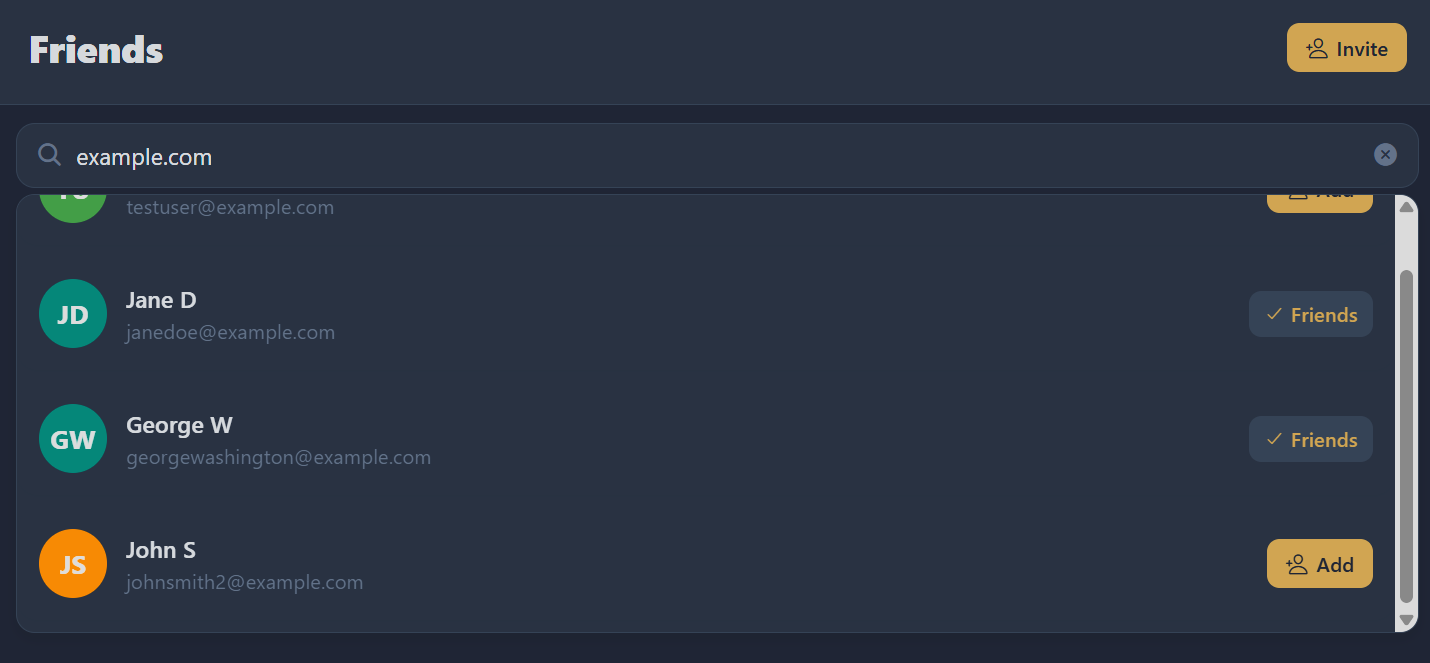
Inviting New Users
Tap Invite in the Friends tab header to share a referral link. When they sign up, you're automatically added as friends — no separate friend request needed.
Managing Friend Requests
Incoming requests show Accept/Decline buttons. When a friend request arrives while you're using the app, a banner appears at the top of the screen with inline Accept/Decline — no need to navigate away.

Payment Platforms
| Platform | Support | How It Works |
|---|---|---|
| Venmo | Full | Opens Venmo app with pre-filled charge request (payer) or payment (participant). Best experience. |
| PayPal | Full | Generates PayPal.me link with amount. Participant-initiated (no charge requests). |
| Cash App | Partial | Pay or request opens cash.app/$tag/AMOUNT — if Cash App is installed, the app launches with the recipient and amount pre-filled. Without the app, the URL shows a QR code login page (Cash App has no web checkout). Direct pay effectively requires the Cash App mobile app on the paying device. |
| Zelle | Partial | Shares phone/email handle. Participant uses bank app — cannot pre-fill amounts. |
| Guest Links | Full | Web page with breakdown and payment buttons. No account required. Links expire after 30 days. |
Profile & Settings
Editing Personal Info
Edit your First Name, Last Name, or Display Name from your profile. Your Display Name is what others see. Email is read-only.
Changing Your Password
Expand the Change Password section in your profile. If you signed up with Google and don't have a password, you'll see Set Password instead — no current password required.
Managing Payment Handles
Tap any platform to expand and edit your handle. Use Paste or Use my email for quick entry. Toggle Use as default payment method to set your primary. One handle per platform.

Notification Preferences
| Notification | Triggers When |
|---|---|
| Added to a split | Someone adds you as a participant |
| Friend requests | Someone sends you a friend request |
| Friend request accepted | Someone accepts your request |
| Payment requested | The payer sends you a payment request |
| Marked as paid | Someone marks themselves as paid |
| Split fully settled | All participants have paid |
| Collection activity | Changes to a collection you're in |
Location Sharing
When enabled, friends within ~3km show a Nearby badge in the participant picker. Location is shared only while the app is in the foreground, pings expire after 30 minutes, and it's disabled by default.
Themes & Appearance
DivIt offers 7 themes:
| Theme | Style |
|---|---|
| Dark (default) | Dark navy, gold accent |
| Midnight | Deep purple, lavender accent |
| Ocean | Dark blue, sky blue accent |
| Forest | Dark green, bright green accent |
| Minimal | Light gray, blue accent |
| Bold | Dark with warm amber tones |
| Friendly | Light with orange accent |
Premium Features
Unlimited receipt scans, no ads, and early access to new features. Upgrade from your profile.
Free tier includes limited scans per day (count shown in profile) and interstitial ads after creating splits. All other features are fully available on free.
Multi-Currency Support
DivIt supports 10 currencies. When scanning a receipt, the currency is auto-detected. Payment links show converted amounts.
| Currency | Decimals |
|---|---|
| USD, EUR, GBP, CAD, AUD, CNY, THB, MXN | 2 |
| JPY, KRW | 0 |
Each split uses a single currency. Currency cannot be changed after creation.
Tips & Best Practices
- Set up Venmo first — It provides the smoothest payment experience
- Take clear receipt photos — Good lighting, steady phone, capture the entire receipt
- Review parsed items — AI is good but not perfect. Always verify before proceeding.
- Use collections for trips — Settle up once with simplified balances
- Enable location sharing — Faster participant adding at the same venue
- Invite mid-split — Friend list refreshes automatically so you don't lose progress
- Set a primary payment method — It's shown first to participants
- Mark paid promptly — Keep splits accurate
Known Limitations
- Receipt images are permanently deleted on archive
- Email cannot be changed (re-register required)
- One handle per payment platform
- Zelle and Cash App can't pre-fill amounts
- Currency is fixed per split after creation
- Guest links expire after 30 days
- Archived splits are read-only
- Payer must be a registered user (not a guest)
FAQ
Can I split a bill with someone who doesn't have DivIt?
Yes! Add them as a guest by typing their name. Generate a guest payment link that works in any browser.
What if the receipt scan gets something wrong?
Tap Edit to correct items, prices, or totals. Use the split-screen compare feature to cross-reference with the receipt photo.
Can I change who paid after creating a split?
Yes. On the split detail page, you can change the payer. The previous payer's "paid" status is reset.
How do collections simplify settling up?
Collections calculate net balances across all splits. If you owe Alice $20 on one split but she owes you $15 on another, the collection shows you owe just $5.
Is my location data stored?
Location pings expire after 30 minutes and are only shared with accepted friends. Off by default.
What's the difference between tip and gratuity?
Tip is voluntary. Gratuity is a mandatory service charge on the bill. Both are distributed proportionally.
Can I use DivIt on the web?
Yes! Visit app.divitapp.com. Some features like receipt scanning and push notifications are mobile-only.
How do I cancel my Premium subscription?
Manage your subscription through the Google Play Store or App Store. DivIt does not handle billing directly.